How I Do It: Real-Time Ultrasound-Guided Spinal Anesthesia
This article originally appeared in theASRA News, Volume 12, Number 2, pp 22-23 (May 2012).
Author
Paul McHardy MD FRCPC
Fellowship Coordinator, Department of Anaesthesia
Sunnybrook Health Sciences Centre
Section Editor: Steven Orebaugh, MD
Most peripheral nerve blocks at our centre use an ultrasound-guided approach, and we were keen to develop a "real-time" ultrasound-guided approach to spinal anesthesia. While ultrasound has been described for pre-puncture scanning,[1-3] few existing case reports utilizing various real-time techniques have been published.[4-5] We experimented with a "modified" paramedian in-plane approach. By adding ultrasound and understanding certain unique features of lumbar vertebral sono-anatomy,[6] this approach becomes less of a guessing game and success can frequently be achieved on the first pass of the needle.
The real-time ultrasound-guided spinal technique is advanced. From an imaging standpoint and a conceptual one, it is relatively-easy to teach and understand. The actual technical skills required are complex, however, and beginners may find this procedure difficult.
The technique should be approached like any other spinal anesthetic with the usual considerations, contraindications, and sterile preparation. The patient is placed in the sitting or lateral position. The ultrasound machine should be set up for a medium to deep scan with a 2-5 MHz curvilinear probe. The probe should be covered with a sterile cover and held in the non-dominant hand. The initial scan (paramedian view) should be made in the parasagittal plane just lateral to the midline of the spine starting at the level of the sacrum. The ultrasound should be moved cephalad in this plane until the lumbar laminae and spaces between can be visualized. Once the target level has been chosen, the mid-point between the two lamina should be positioned in the middle of the screen then the probe should be rotated approximately 30 to 60 degrees so that the cephalad pole of the probe moves towards the midline with the goal of maintaining a view of lamina of the caudad vertebral body (e.g., L4) and, at the same time, bringing the spinous process of the cephalad vertebral body (e.g., L3) into view (Fig. 1).

Figure 1. Model demonstration showing the approximate placement and orientation of the ultrasound probe in relation to the vertebral column
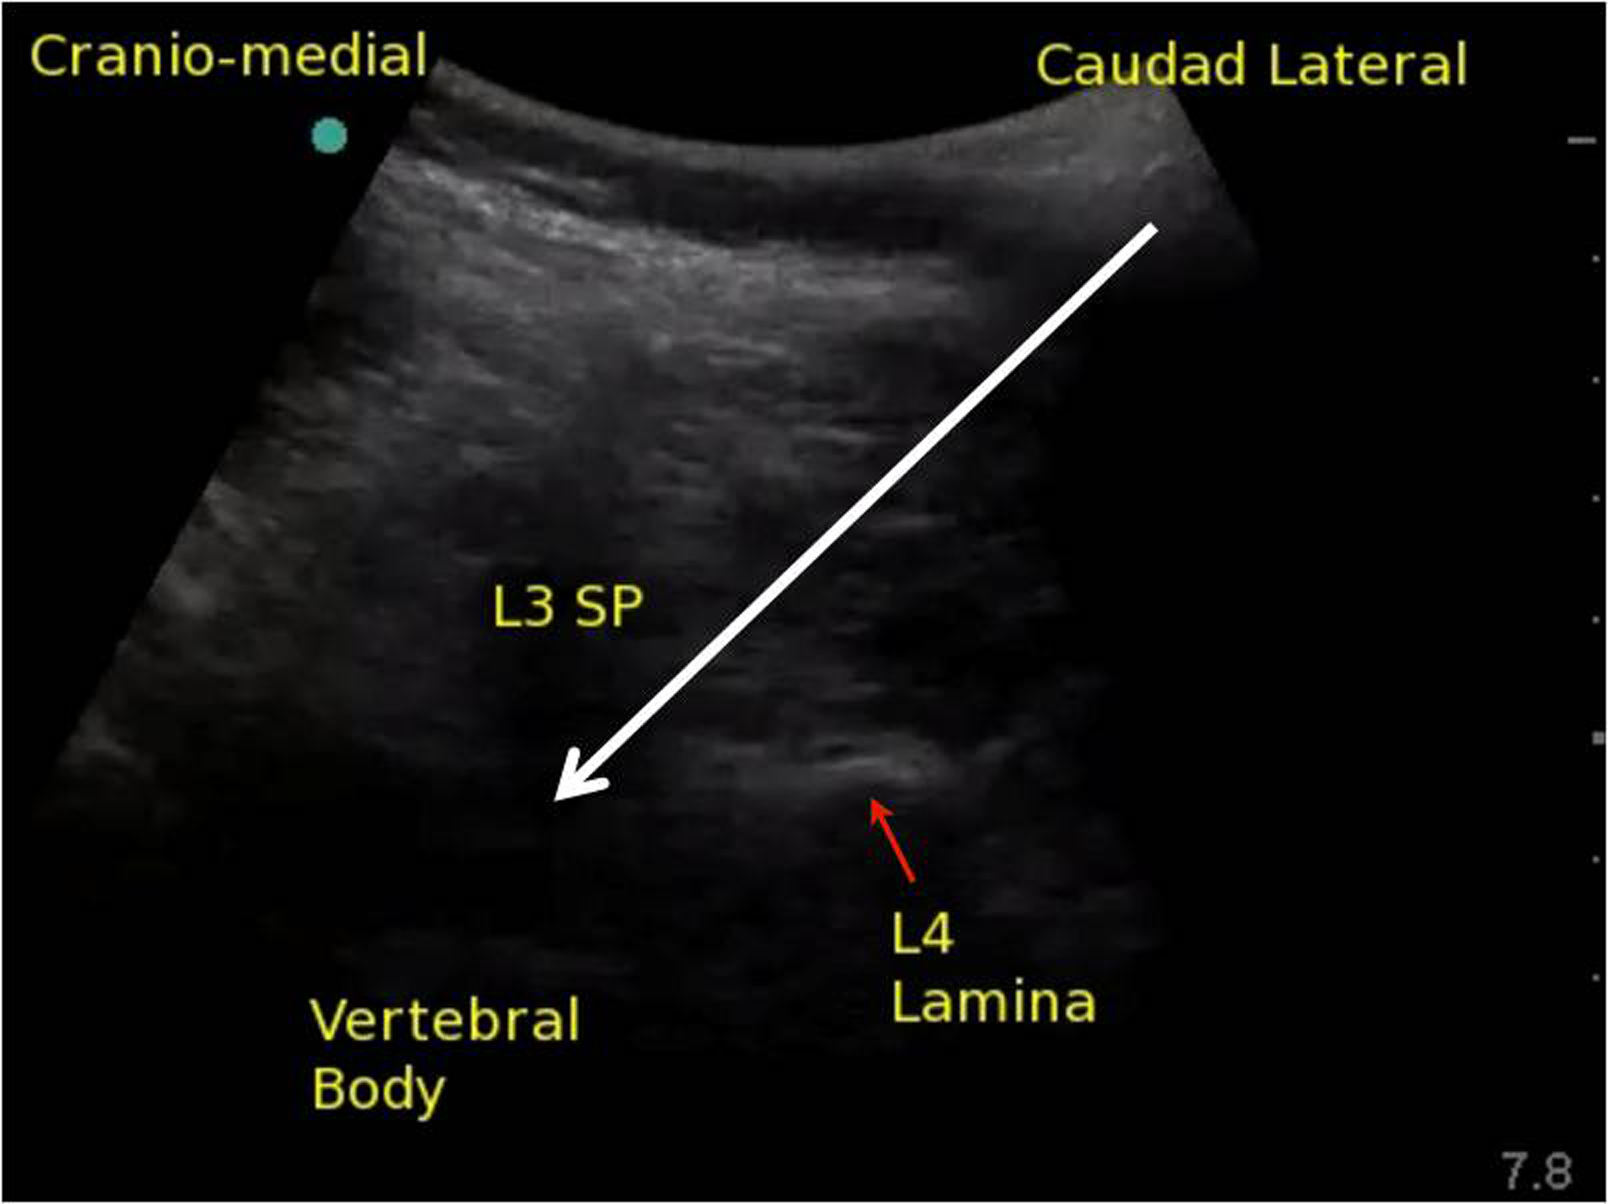
The upper part of the image is the spinous process as it translates into the lamina of the cephalad vertebra; the lower part of the image is the lamina of the caudad vertebral body (Fig. 2). The image as a whole is an oblique view of the bony components that overlie the paramedian window between two vertebrae. If the window is wide enough (this is more common in younger patients), the ligaments and intravertebral components can be visualized. If the window is narrow, the operator may only be able to identify the bony landmarks as describe as above. Before introducing the needle, the operator must move the probe towards midline in precisely the axis that the probe has achieved its best view to bring the target structures closer to the needle entry point otherwise the needle insertion may be too lateral.
Infiltrate skin with local anesthetic beside the lateral edge of the probe then insert the needle or introducer. A 22 gauge needle is probably the best size of needle for this technique; thinner (e.g., 25 gauge) needles bend away from the intended trajectory without any change in the feel of the needle's advancement. However, a longer introducer may be used in conjunction with a smaller-gauge spinal needle to establish the intended trajectory and decrease the likelihood of needle wandering. This is a deep block, and needle visualization can be challenging, but continuous movement with the needle and observation of tissue movement can help with visualization. The needle should be visualized at all times and should be directed toward the base of the triangle (Fig. 2). If the image does not allow for a full view of the spinal canal, then the needle point will disappear as soon as it enters the base of the triangle shadow. At this point, the resistance to needle advancement should change as it enters ligament. The needle should continue to be advanced until loss of resistance is felt. The intrathecal space should be achieved within 1 to 2 cm of entering the space bounded by the triangle shadow. A two-handed technique is employed to inject the local anesthetic. With an assistant scanning, it is possible to visualize the spread of local anesthetic as it is injected using colour Doppler.

Figure 2. Ultrasound image of the space between the L3 spinous process (SP) and L4 lamina; white arrow represents the planned needle trajectory toward the intrathecal space
References
- Chin KJ, Chan V: Ultrasonography as a preoperative assessment tool: predicting the feasibility of central neuraxial blockade. Anesth Analg 2010; 110: 252-3
- Chin KJ, Perlas A, Chan V, Brown-Shreves D, Koshkin A, Vaishnav V: Ultrasound imaging facilitates spinal anesthesia in adults with difficult surface anatomic landmarks. Anesthesiology 2011; 115: 94-101
- Carvalho JC: Ultrasound-facilitated epidurals and spinals in obstetrics. Anesthesiol Clin 2008; 26: 145-58, vii-viii
- Chin KJ, Chan VW, Ramlogan R, Perlas A: Real-time ultrasound-guided spinal anesthesia in patients with a challenging spinal anatomy: two case reports. Acta Anaesthesiol Scand 2010; 54: 252-5
- Lee PJ, Tang R, Sawka A, Krebs C, Vaghadia H: Brief report: real-time ultrasound-guided spinal anesthesia using Taylor's approach. Anesth Analg 2011; 112: 1236-8
- Chin KJ, Karmakar MK, Peng P: Ultrasonography of the adult thoracic and lumbar spine for central neuraxial blockade. Anesthesiology 2011; 114: 1459-85
Leave a commentOrder by
Newest on top Oldest on top