Thoracic Epidural Placement: Clinical Pearls and Perspectives from Experienced Practitioners
Cite as: Machi A, Thai C, Seiffert E, et al. Thoracic epidural placement: clinical pearls and perspectives from experienced practitioners. ASRA Pain Medicine News 2026;51. https://doi.org/10.52211/asra110126.012.
Thoracic epidural analgesia remains a cornerstone of pain management for major thoracic and upper abdominal surgery; yet it is among the more technically demanding neuraxial procedures. Successful placement often depends on small details of preparation, technique, confirmation, and securement that are learned through experience and rarely described in textbooks. In this collaborative review, experienced regional anesthesiologists from different practice settings describe how they approach thoracic epidural placement, from preprocedural planning with imaging and ultrasound, through landmark- and fluoroscopy-guided needle placement, to methods for confirming catheter position and securing the catheter. By presenting these perspectives side by side, we aim to highlight shared principles and practical variations that clinicians can adapt to their own patients and practice environments.
In What Ways Do You Prepare for an Epidural?
Anthony Machi, MD: In addition to basic procedural considerations, whenever possible, I review any available relevant imaging before the procedure. I typically review a chest CT and, occasionally, a thoracic MRI. I use these studies to assess the spinal anatomy, estimate depth to the lamina and ligamentum flavum, and identify factors—such as scoliosis or challenging interspaces—that may influence my approach.
When time permits, I will perform an ultrasound examination of the thoracic spine before the procedure. Ultrasound allows me to assess the depth to the interlaminar space in the sitting position, evaluate the anticipated needle trajectory, and identify the optimal insertion point. This is particularly helpful when anatomy is difficult or landmarks are less reliable.
I also frequently rely on surface landmarks. I palpate the C7 vertebra prominens and the caudal aspect of the scapula in neutral position and look for the cephalad aspect of the intergluteal cleft. In most individuals, the midpoint between the vertebra prominens and the intergluteal cleft approximates the T10 vertebral level. This estimate can then be triangulated with the level suggested by the caudal aspect of the scapula to improve confidence in identifying the desired thoracic interspace.
Carolyn Thai, DO: After reviewing the patient’s medical history, including anticoagulant use, bleeding disorders, and relevant laboratory values, particularly coagulation studies and platelet count, I also review the surgical plan to understand the expected degree of postoperative pain, anticipated blood loss, and the potential need for transfusion. I try to preempt a plan for discontinuing epidural days later. If significant blood loss is anticipated, I try to anticipate the patient’s postoperative course and begin planning for eventual epidural discontinuation.
Kwesi Kwofie, MD: When placing a thoracic epidural, after thorough review of the patient and the surgery, consent discussion, monitoring, and typically some sedation, I will routinely assess the spine sonographically to determine the level of placement, rule out rotational scoliosis, determine the midline if not palpable, assess the depth to the ligamentum, and determine the most patent space of the available appropriate spaces. Then I would prepare the patient and field aseptically, including a mask, cap, and sterile gown.
Patrick Hartmann, MD: At Dartmouth Health, we place thoracic epidurals with fluoroscopic guidance and confirmation by our acute pain medicine service. The service includes a regional fellowship-trained anesthesiologist, a dedicated team of sedation nurses, and rotating trainees ranging from intern to fellow.
Before the scheduled surgery time, we bring patients to the dedicated acute pain procedure room. The patient moves into the prone position on a radiolucent bed. Appropriate monitors are placed, and nurse sedation is administered. An anterior-posterior radiograph of the spine is obtained using mobile fluoroscopy (C-Arm).
What Details of your Technique Help you perform a Smooth, Gentle, and Efficient epidural?
Machi: I aim to minimize patient discomfort and anxiety by explaining each step before beginning. After addressing any questions, I perform a protocolized time-out.
I then offer the patient the option of light sedation. If desired, I administer a small amount of midazolam, fentanyl, or a combination of the two. I also offer patients the opportunity to listen to music of their choosing, which I provide from a streaming platform.
As I begin the procedure, I first identify the spinous process above the intended epidural insertion site. Then I select a starting point approximately 1 to 1.5 fingerbreadths to the right of the lateral edge of the spinous process, adjusting this distance based on the patient’s body habitus.
Using a 27-gauge 1.5-inch (3.8 cm) needle attached to a 3-ml syringe containing 1% lidocaine, I first inject 1 mL subdermally. I then use this needle to advance toward the lamina. If I touch the lamina, I will inject 0.25-0.5 mL, retract the needle to take a new, slightly cephalad trajectory, and repeat the process. I continue this sequence until I have identified both the target interspace and the inferior aspect of the lamina at the level above. With each redirection, I inject an additional 0.1-0.25 mL aliquot of lidocaine. This technique serves several purposes simultaneously:
- It helps define the optimal trajectory for the subsequent Tuohy needle.
- It provides progressive local anesthesia along the anticipated needle path.
- It creates a mini-retrolaminar block using less than 1 mL of 1% lidocaine.
Once I identify the interspace, establish the ideal trajectory, and anesthetize it, I insert the Tuohy along this optimized path to the depth of the pre-identified interspace and proceed with a loss of resistance (LOR) technique.
During this portion of the procedure, I intermittently advance the needle with my right hand at the proximal needle or syringe for LOR while the left hand either stabilizes or provides counterpressure on the paraspinous muscles when testing LOR. This technique increases the pressure felt when testing resistance and produces a more distinct change in resistance when the epidural space is entered.

Thai: Along the lines of minimizing patient discomfort and anxiety, I use an epidural positioner with padded face and arm supports, which helps patients maintain an optimal position comfortably. After time-out, I administer midazolam and reassure patients that I will guide them through each step, so there are no surprises.
Kwofie: I frequently use an epidural positioning device when available instead of using a person to support the patient because it is more stable and prevents the patient from passively flexing at the hips when pressure is placed on the patient’s back during needle advancement.
I generally prefer a paramedian approach as interlaminar spaces are much larger. I walk the needle off the lamina and then use a continuous technique with a plastic LOR syringe with saline without a bubble to increase the pressure change when the ligamentum is penetrated.
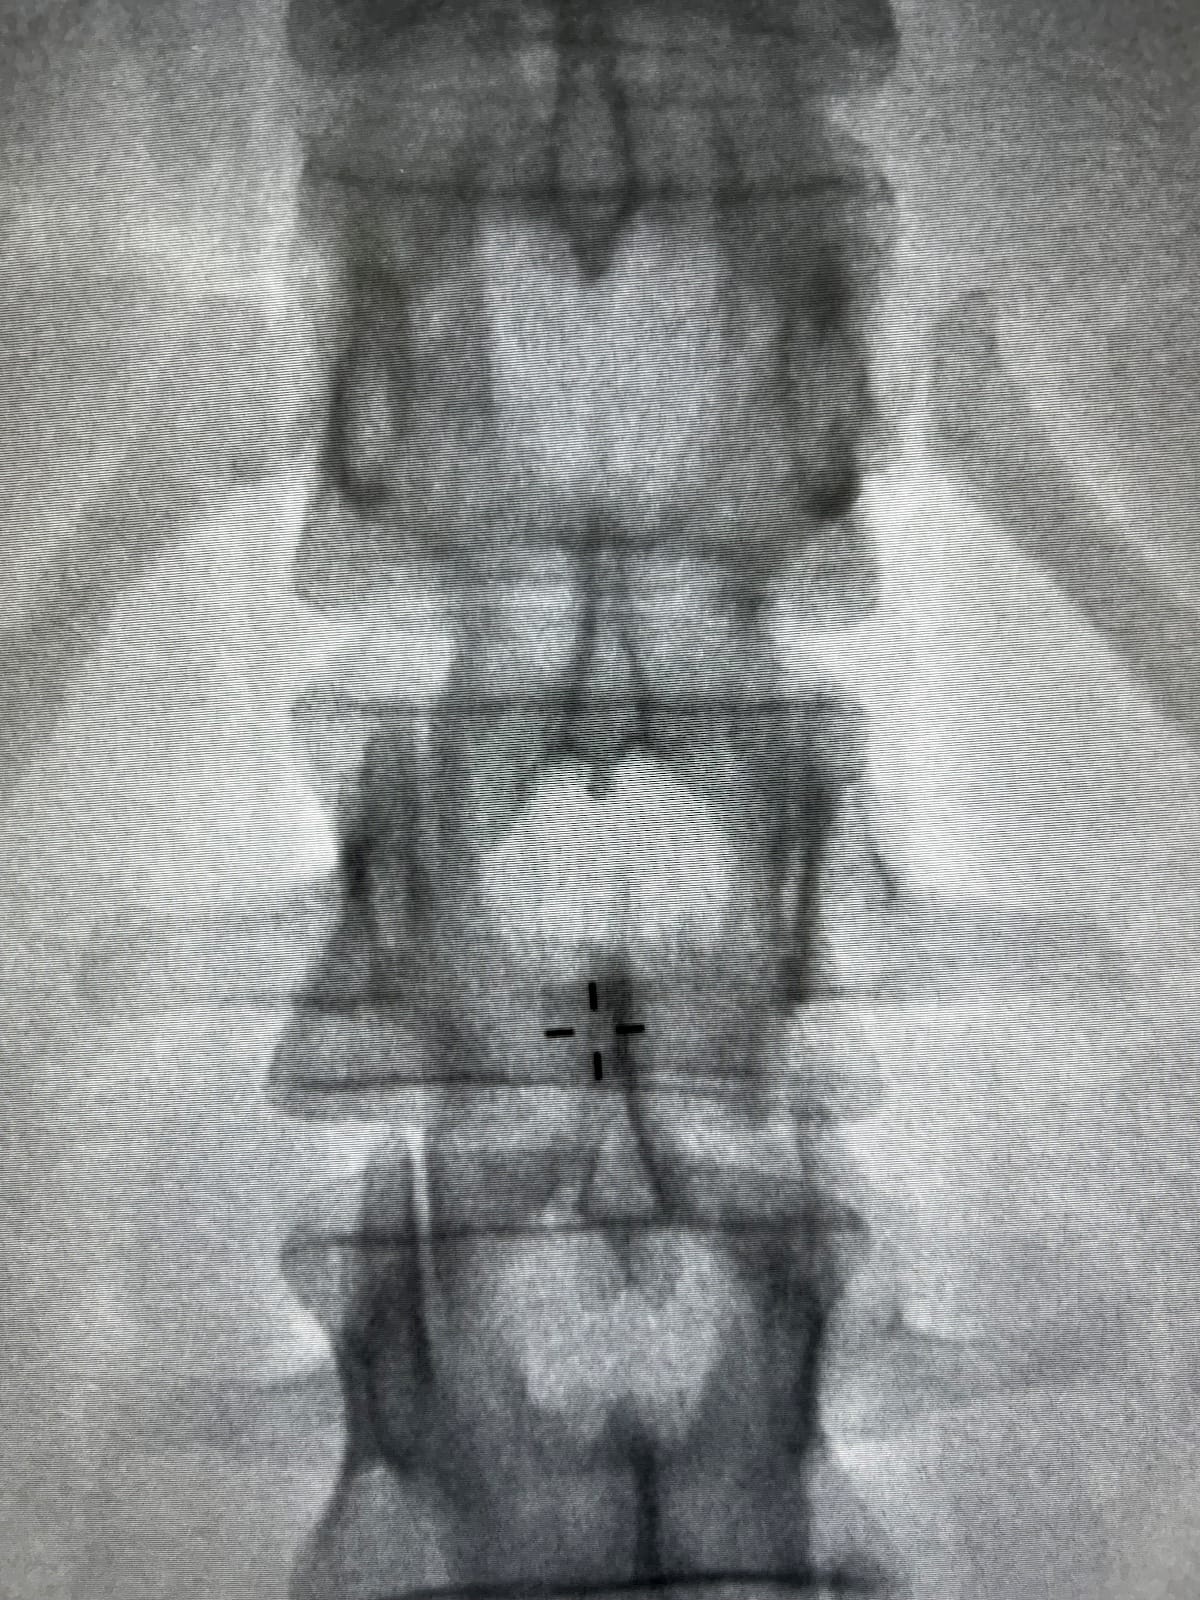
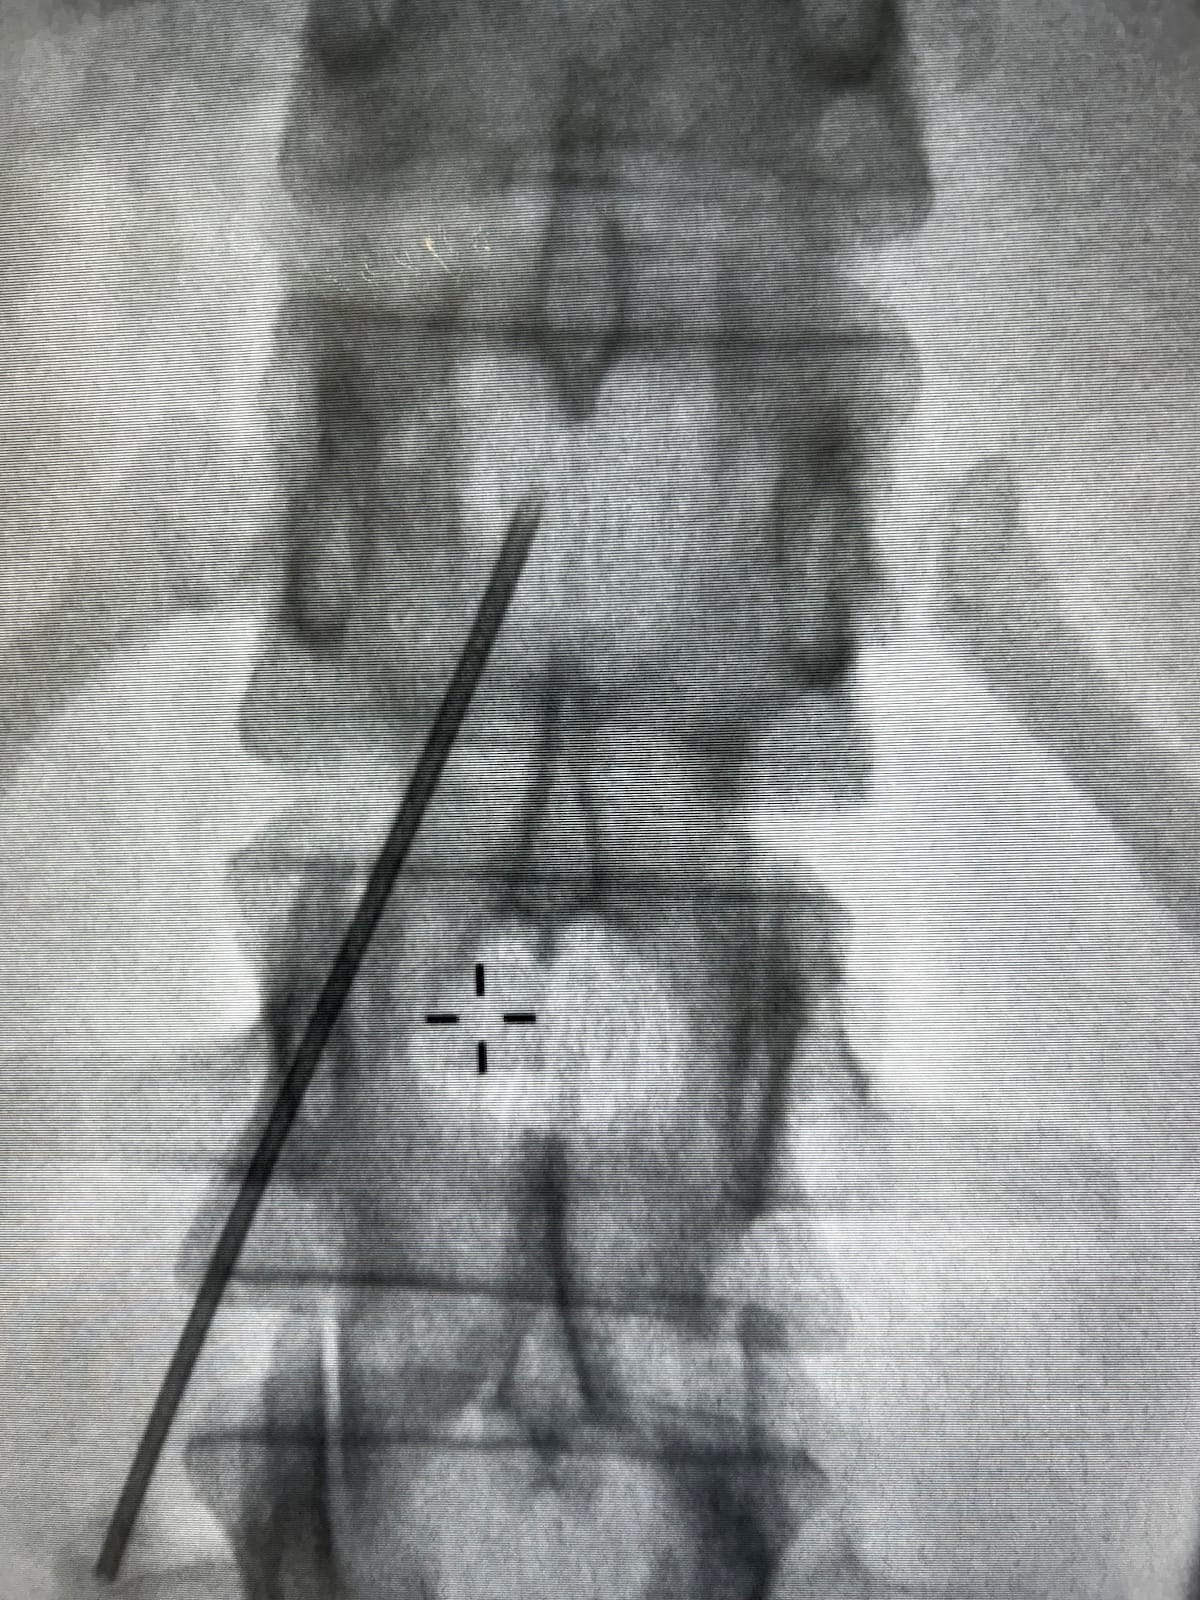
Hartmann: For all thoracic epidurals, entry into the epidural space is obtained at a high lumbar to low thoracic space using fluoroscopy to guide needle placement. A traditional LOR syringe is used in conjunction with fluoroscopic guidance. Anteroposterior (AP) and lateral images can both guide needle placement. (Figures 1 and 2)
How Do You Test After Obtaining Loss?
Machi: Typically, I perform a fluid column test to assess for negative pressure within the epidural space. I also look for subtly pulsatile fluid movement, which I consider an approximation of epidural pressure waveform analysis. If there is any uncertainty regarding epidural placement—such as in patients with scoliosis or those undergoing technically challenging thoracic epidural placement—I will perform an electrical stimulation test (Tsui Test) to confirm catheter location.
I then thread the epidural catheter and administer a test dose of 3 mL of lidocaine 1.5% with 1:200,000 epinephrine.
Thai: After I achieve LOR, I thread the catheter, and if it advances smoothly, I connect the adapter and give a test dose after a negative aspiration. I then perform a meniscus test by disconnecting the catheter and observing for fluid movement into the epidural space. I hold the catheter upright and watch as fluid is pulled down into the epidural space. A visible drop of fluid provides additional confirmation of epidural placement. If the epidural catheter was threaded into a different space, like subcutaneous fat, then the drop of fluid would be absent.
Kwofie: First, I will say that not all losses are the same. I would describe a saline syringe with no air that goes from rock hard to supple as a crisp LOR. This is reassuring but not completely confirmatory. The absence of a crisp LOR will raise suspicion of a false LOR but would never change my actions at this point. I will always do a confirmatory test because the failure rate of thoracic epidurals in the literature is exceptionally high.
After placing the catheter to the desired depth, I will allow the patient to find a comfortable position, and while maintaining a sterile field, I will perform a confirmatory test.
My preferred confirmation is usually an epidural electrical stimulation test, also known as the Tsui Test. This involves a regular wire-reinforced flexible epidural catheter, a Johan adapter, a nerve stimulator, and a syringe of saline. The stimulator’s electrical impulses travel through the saline in the catheter to the nerve roots, creating an evoked motor response at the catheter tip. A current between 1 and 15 mA is characteristic of epidural placement.
If an appropriate stimulator is not available, I will conduct an epidural waveform analysis through the needle before threading a catheter with sterile, non-compressible tubing connected to a transduced arterial line. A pulsatile waveform that corresponds to the pulse is characteristic of epidural positioning.
Absence of a crisp LOR and absence of a positive confirmatory test will always lead me to re-site an epidural.
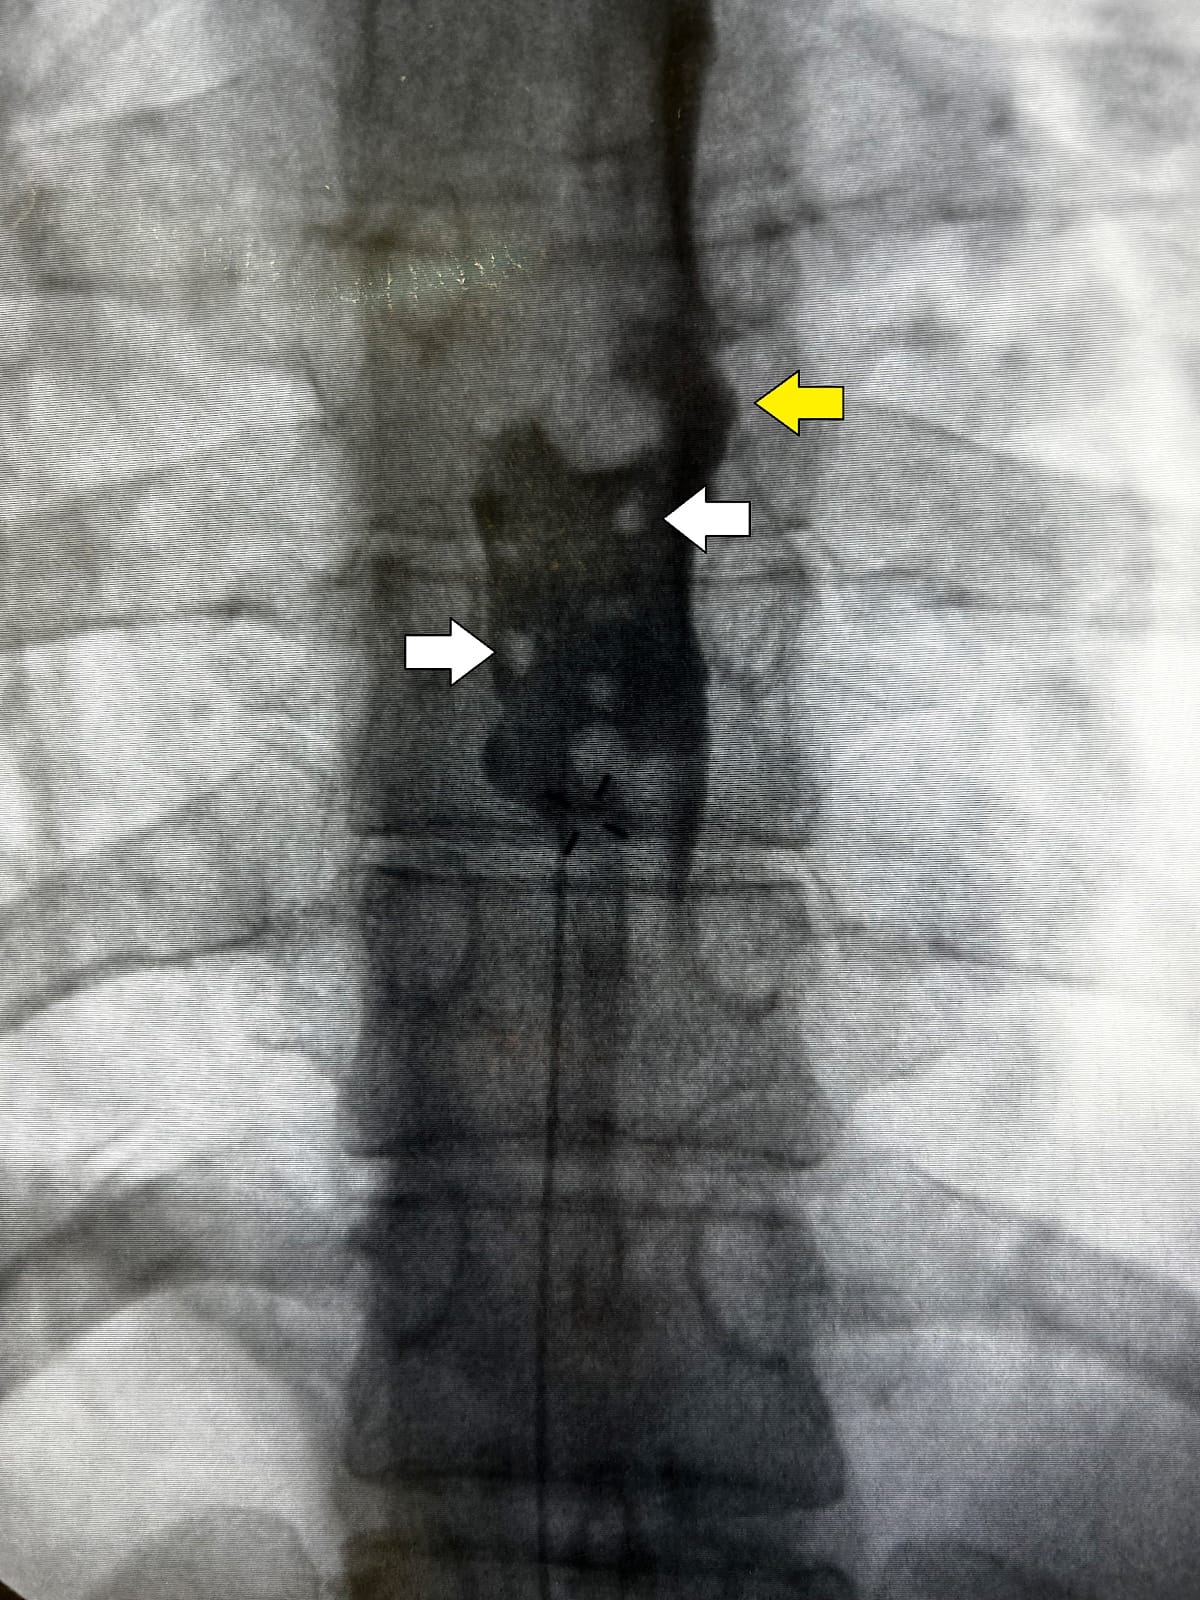
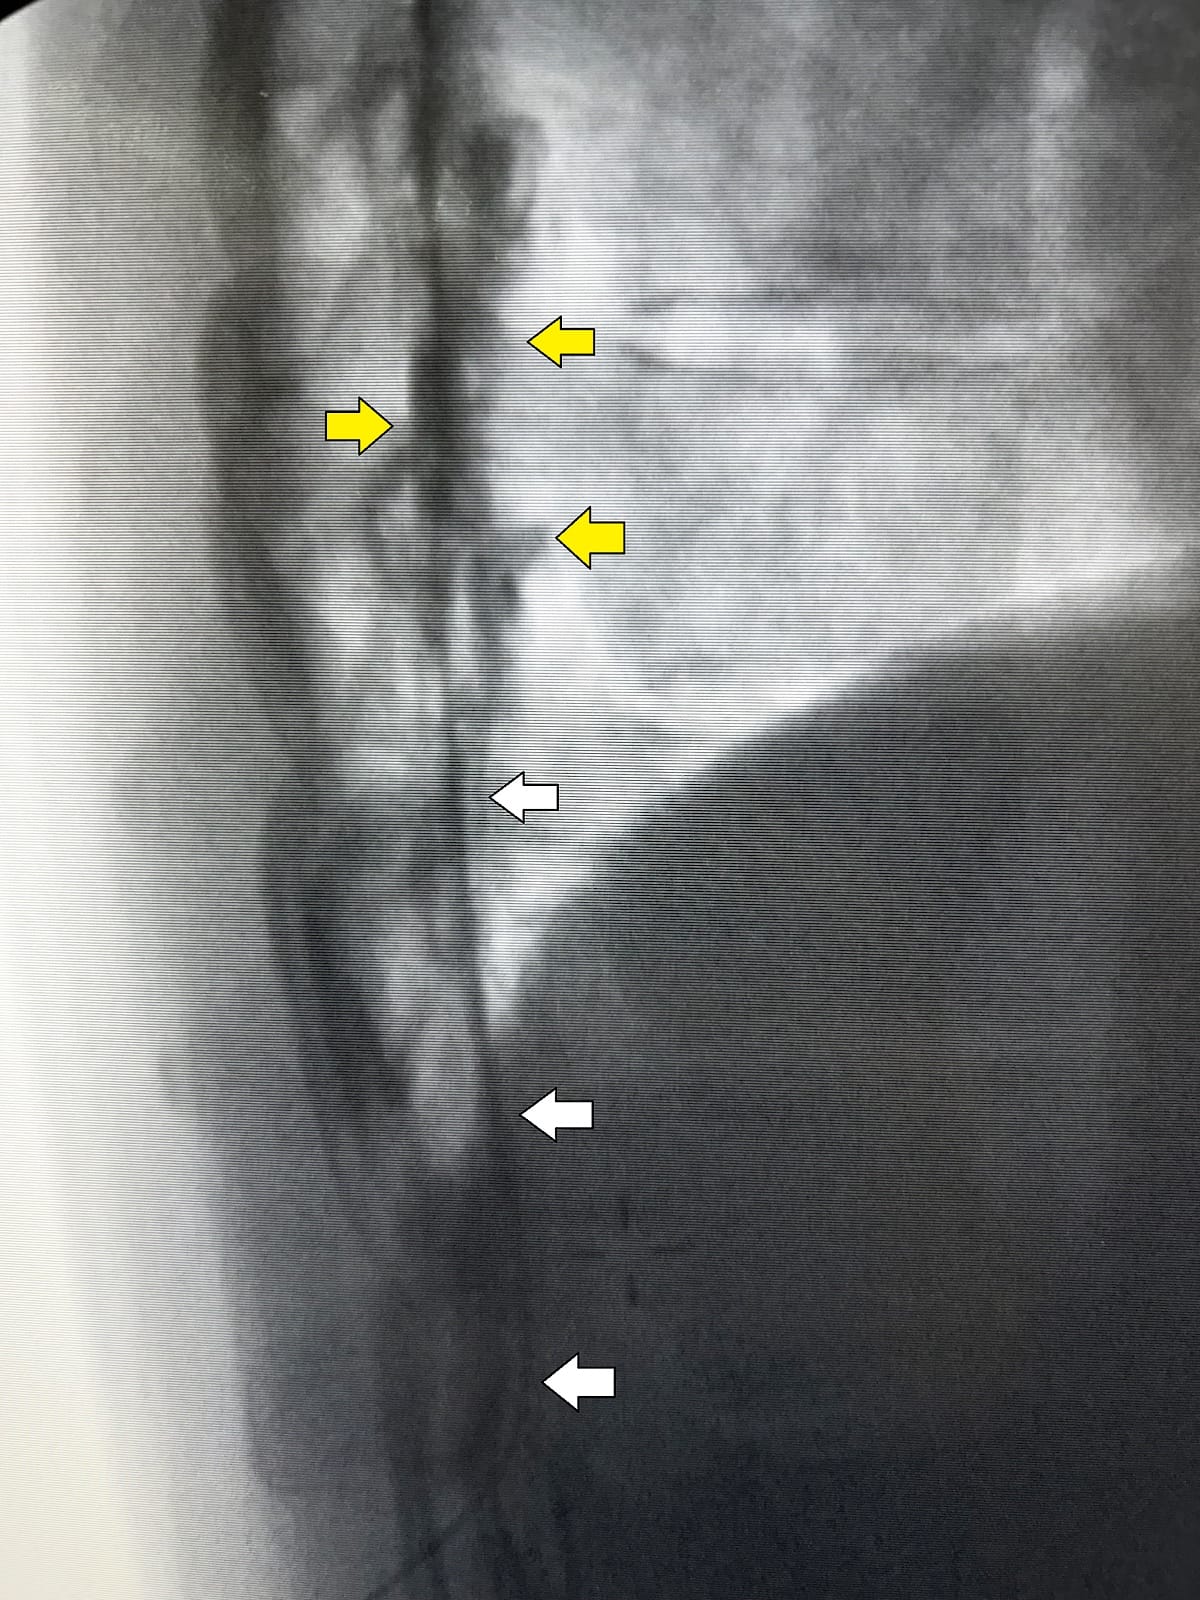
Hartmann: Once LOR is obtained, thread a wire-reinforced epidural catheter to the appropriate level to achieve ideal dermatomal coverage for the planned surgical procedure (Figure 3).
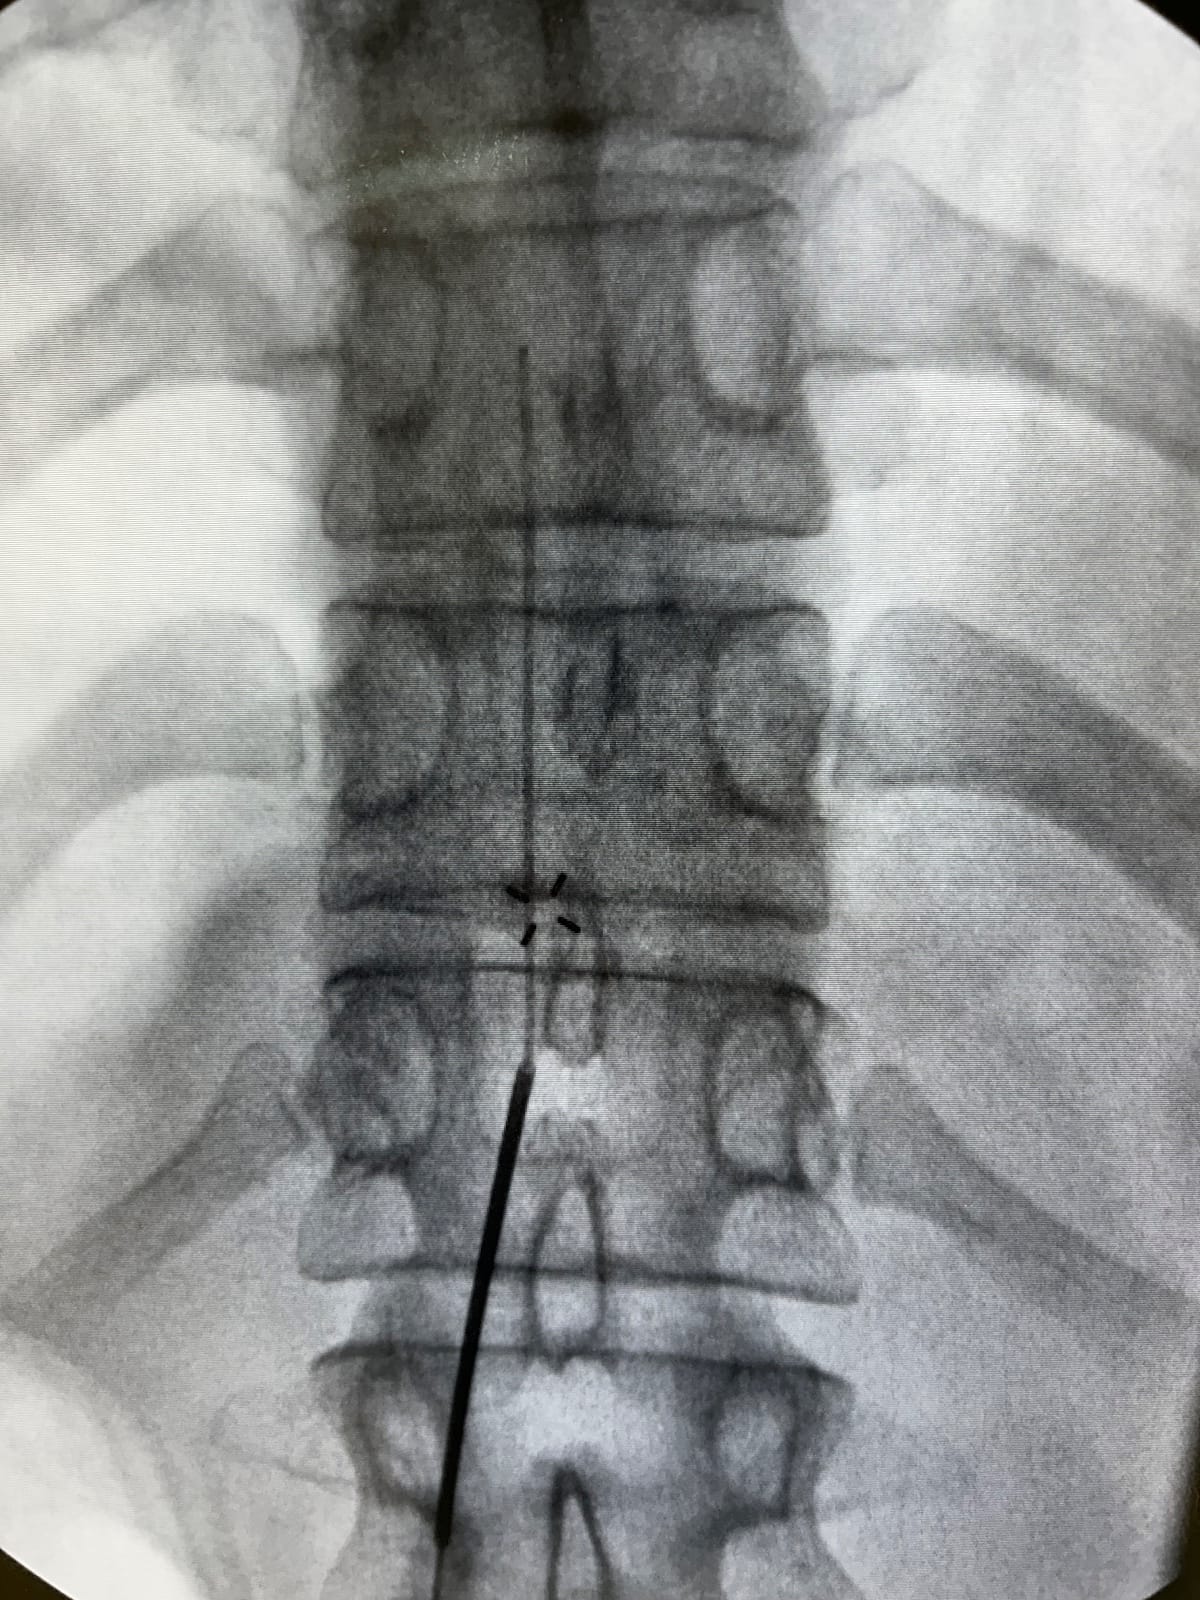
Administer iodinated contrast through the epidural catheter to confirm correct placement within the epidural space. AP and lateral images of contrast spread confirm placement (Figures 4 and 5). Incorrect locations, such as intrathecal, subdural, intravascular and subdermal, all have characteristic contrast spreads, which allow for immediate recognition and replacement. A test dose is not routinely performed.
How Do You Complete the Procedure?
Machi: After securing with Dermabond, Mastisol, and a Tegaderm dressing with integrated chlorhexidine gluconate gel pad, the final step is testing a level to ice to confirm bilateral spread and distinguish the cephalad and caudad extension of dermatomal spread to include in documentation. The test dose for a T7-8 placed catheter typically produces a bilateral T4-10 sensory level to ice within approximately 10 minutes.
Thai: I like to secure my epidurals with Steri-Strips and Mastisol with a Tegaderm dressing over it. If time allows, I test for a level with ice as above.
Kwofie: Once the catheter is positioned and confirmed, I apply Mastisol around the dressing area to make the skin more adhesive, then apply a soft securement device (Epi-Guard), a large Tegaderm, and paper tape around the Tegaderm to create a window up to the shoulder. The insertion site must be visible through the window. I then activate the paper tape by rubbing an alcohol swab on the outside of it. This makes the tape stick better. Once the catheter is connected to the pump, I secure the connection to the patient with a Tegaderm.
Hartmann: A chlorhexidine gluconate Tegaderm dressing is placed directly over the insertion site and further reinforced with additional Tegaderm dressings. The Patients are returned to the supine position in their stretcher and transported to their operating room for surgery. Because imaging has already verified the epidural tip location, no further confirmatory or dermatomal tests are performed.
Thank you to Ellen Seiffert, MD, for acquiring and curating the fluoroscopic images (Figures 1–5), illustrating the fluoroscopy-guided technique described in this article.