How I Do It: Real-Time Ultrasound-Guided Thoracic Epidural Placement
Cite as: Mathur V, Rayaz H. How I do it: real-time ultrasound-guided epidural placement. ASRA Pain Medicine News 2026;51. https://doi.org/10.52211/asra080126.014.
How I Do It
Introduction
As ultrasound imaging continues to improve and proceduralists continue to evolve with these advancements, this imaging modality is being applied to procedures that are classically done via landmark techniques, even when those techniques are largely successful.1 The authors consider this an exciting time to develop practice and familiarity with the continuously growing application of ultrasound. When considering the use of real-time ultrasound guidance, the proceduralist would need to determine how best to use this technique and the details of maximizing technical success.
First, the literature is somewhat mixed regarding the usefulness of real-time ultrasound-guided epidural placement. On the one hand, real-time ultrasound guidance does not seem to improve the success rate or the number of needle manipulations for lumbar combined spinal-epidural techniques compared with the classic landmark-guided technique,1 although it has been shown to be a feasible alternative.2 However, real-time ultrasound guidance may help with first-pass success for thoracic epidural placement.3 Furthermore, one study showed real-time ultrasound guidance can have similar success and faster placement of thoracic epidurals compared to fluoroscopic guidance.4 The authors will focus on real-time ultrasound guidance for thoracic epidural placement in this article due to thoracic placement being a convenient alignment of the literature and the authors’ clinical practice.
How I Do It: Functional Anatomy
Preparatory Work
Step one is always to perform a medical survey of the chart to ensure appropriate patient selection for neuraxial and to identify any contraindications. Considerations include the patient’s wishes, anticoagulation status, pain history, spine history, and neurologic history.
Our experience is that our patients do not like surprises on the day of the surgery. Video-assisted patient education may also improve information transfer and provide a time-saving effect on the morning of surgery.5 The authors are fortunate to have access to an electronic medical record in which we can send an epidural video through the portal in advance. Even without this technology available, simply introducing the concept beforehand, either through the surgeon or the preoperative clinic, is valuable.
When choosing an insertion site, we prefer a level that is congruent with the incision center for maximal analgesic benefit. Examples include T5 for open thoracotomy, T7 for standard video-assisted thoracic surgery (VATS), T9 for robotic VATS, and T10 for major abdominal or low-thoracic surgery. As an aside, there is mixed evidence that thoracic epidural placement for VATS cases improves a postoperative multimodal regimen,6 but one of the authors’ home institutions does undergo routine epidural placement for VATS cases to help ameliorate postoperative and, more specifically, chest tube pain. If the surgery is unilateral like a thoracotomy, the authors’ preference is to utilize the paramedian technique on the contralateral side to keep the epidural dressing away from the surgical field.
Utilizing Preoperative Radiological Scans
Many patients undergoing non-obstetric epidurals in the United States have computed tomography (CT) and/or magnetic resonance imaging scans available for review. The authors recommend reviewing these scans to identify levels based on the location of the scapula’s inferior border. (Figure 1) The assumption that the bottom of the scapula corresponds with the level of T7 may lead to inaccurate placement and incomplete analgesia for the patient after surgery. Instead, sagittal and axial images may be linked using a straight-line cursor to easily identify the interspace of interest. In addition, ultrasound can be used to count, starting with the lowest 12th rib upwards or from C7 downwards to whichever level the catheter is to be inserted.
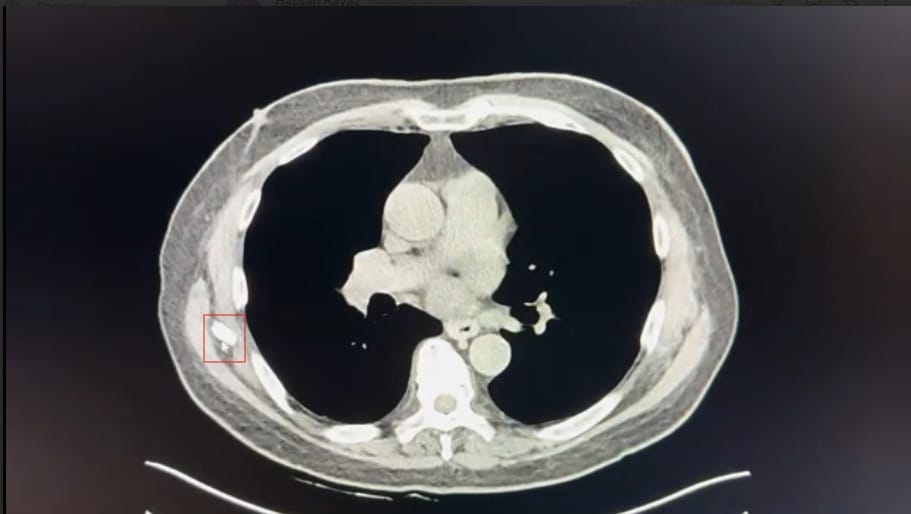
The axial CT slices can be viewed alongside sagittal slices to first assess whether epidural placement is best achieved with a midline or paramedian approach. For low thoracic levels, midline can be the best choice. However, as spinous process angulation increases from T5 to T9, the paramedian approach becomes easier.
On the axial slice at the desired level for catheter placement, use the software measurement calipers to approximate the depth from the skin insertion site to the epidural space through the inter-laminar window, as well as the distance from the midline to the skin insertion site. This frequently requires some amount of scrolling through several image slices. Knowing the slice width on the CT scan can help later down the road when you are placing pen markings with a ruler on the back. Traditional approaches to thoracic epidural placement have advocated standardized starting points a certain number of centimeters lateral and/or inferior to the chosen epidural needle insertion site,7 but this assumes no anatomical variation. Using axial slice measurements can greatly improve prediction of how far down and lateral from the tip of the superior spinous process the needle should be inserted. As body habitus increases, the need to insert further laterally to have the largest interlaminar window target increases.
It is important to remember that this is still an approximation because this measurement is the hypotenuse of one axial triangle. The paramedian approach will also be the hypotenuse of a sagittal triangle. In addition, the CT is performed supine and may compress soft tissue compared to the sitting position. So, this frequently underpredicts the final depth to loss of resistance. Anecdotally, however, we find it is good to have a conservative early prediction.
Equipment Preparation
After obtaining informed consent, assemble all required supplies. Our preference for thoracic epidural placement is to use an epidural positioner chair. Apply standard ASA monitors and provide oxygen, ensuring that emergency equipment and drugs are immediately available. Before sedation, the authors demonstrate the kyphotic position to the patient to facilitate easier placement. Once positioning is understood, perform a time‑out with the nurse and administer sedation as needed before beginning the procedure.
A sterile marking pen with a ruler is used to mark the patient’s back. The inferior aspect of the scapula is palpated, and a mark is made there that corresponds to the level seen on the axial CT image. Then, using measurement data from the earlier CT scan, the predicted zone of insertion is marked.8
The ultrasound machine is placed in front of the proceduralist on the side the proceduralist will be facing. It is disruptive to position the machine in the wrong place, which requires turning one’s head and neck away from the procedure field. The proceduralist’s body, the procedure field, and the ultrasound should all be lined up together like a “billiards shot” so that only one’s eyes need to move.
The ultrasound machine should be programmed to facilitate the best possible image of the neuraxis. If there is a “spine” software choice, then we would choose that. The next best option would be choosing musculoskeletal. Penetration mode with gain turned upwards can be helpful. A small footprint curvilinear probe is ideal.
The back is then prepped with an appropriate antiseptic. Once the prep is dry, place the sterile drape over the dry field, slightly lateral to the midline markings, so that the circle in the drape can easily accommodate the probe and insertion site. The proceduralist will then use a sterile towel kit and lay out the sterile towels to create a field for the ultrasound probe and any epidural equipment that may temporarily rest in the area. It is important to have a non-porous barrier between these towels and the bed. Our sterile towel kits include a sterile plastic sheet for this. A sterile ultrasound probe cover and ultrasound gel are also placed at this time. The gel is routinely placed inside the probe cover prior to draping the probe. When using ultrasound gel on the skin, use only small aliquots and wipe away the gel from the insertion site before needling. Alternatively, sterile injectable saline could be used as an acoustic-conducting medium, eliminating the risk of gel entering the neuraxial space.
Attention is then directed towards preparing the epidural tray. For ultrasound-guided real-time thoracic epidurals, the authors believe wings are essential on the epidural needle. They provide greater surface area for the proceduralist to hold and manipulate the needle, as this will be a partially one-handed technique during advancement towards the neuraxial space.
Once the epidural tray is prepped to satisfaction, the proceduralist is now ready to begin the ultrasound survey of the exposed field of the drape. It’s best to start lateral and identify ribs and pleura. These are very easy and simple to recognize structures on ultrasound. The probe is in the non-dominant hand, with the probe wire bunched in that same hand so it does not interfere with needling as the procedure continues. The probe is currently in a cephalad-caudad orientation. Slide the probe medially to find the transverse processes.9 (Figures 2A–C)
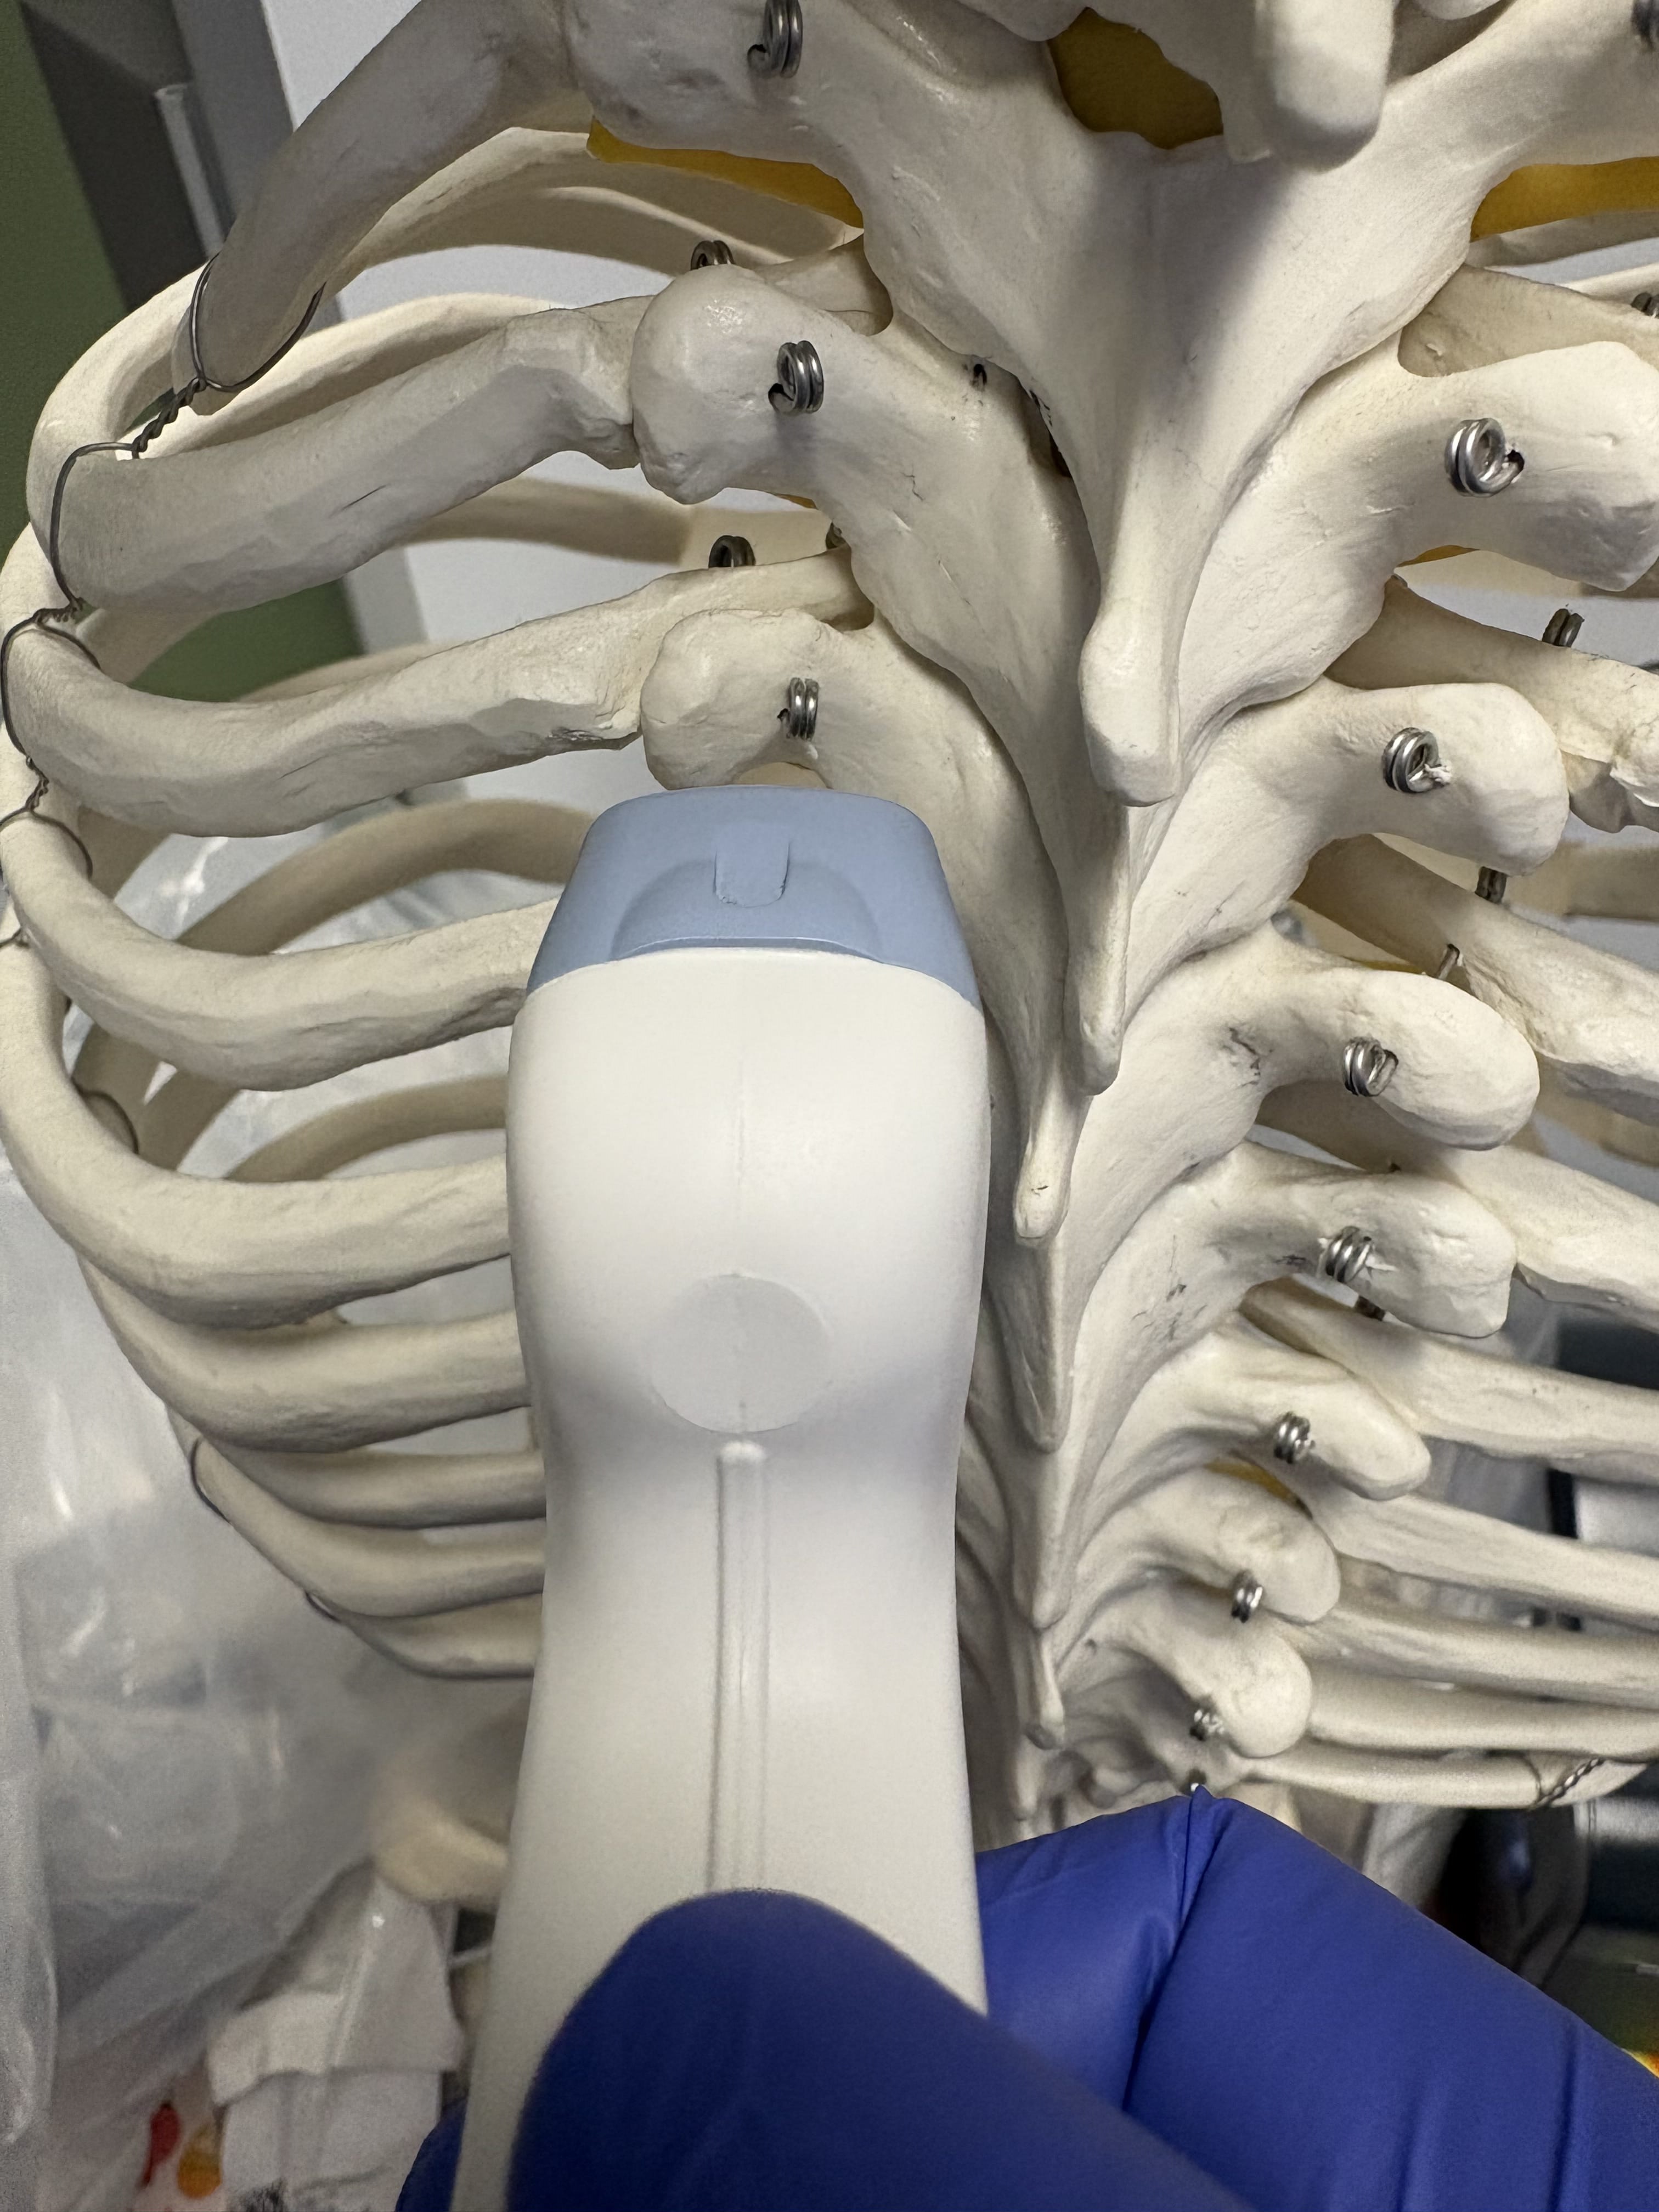
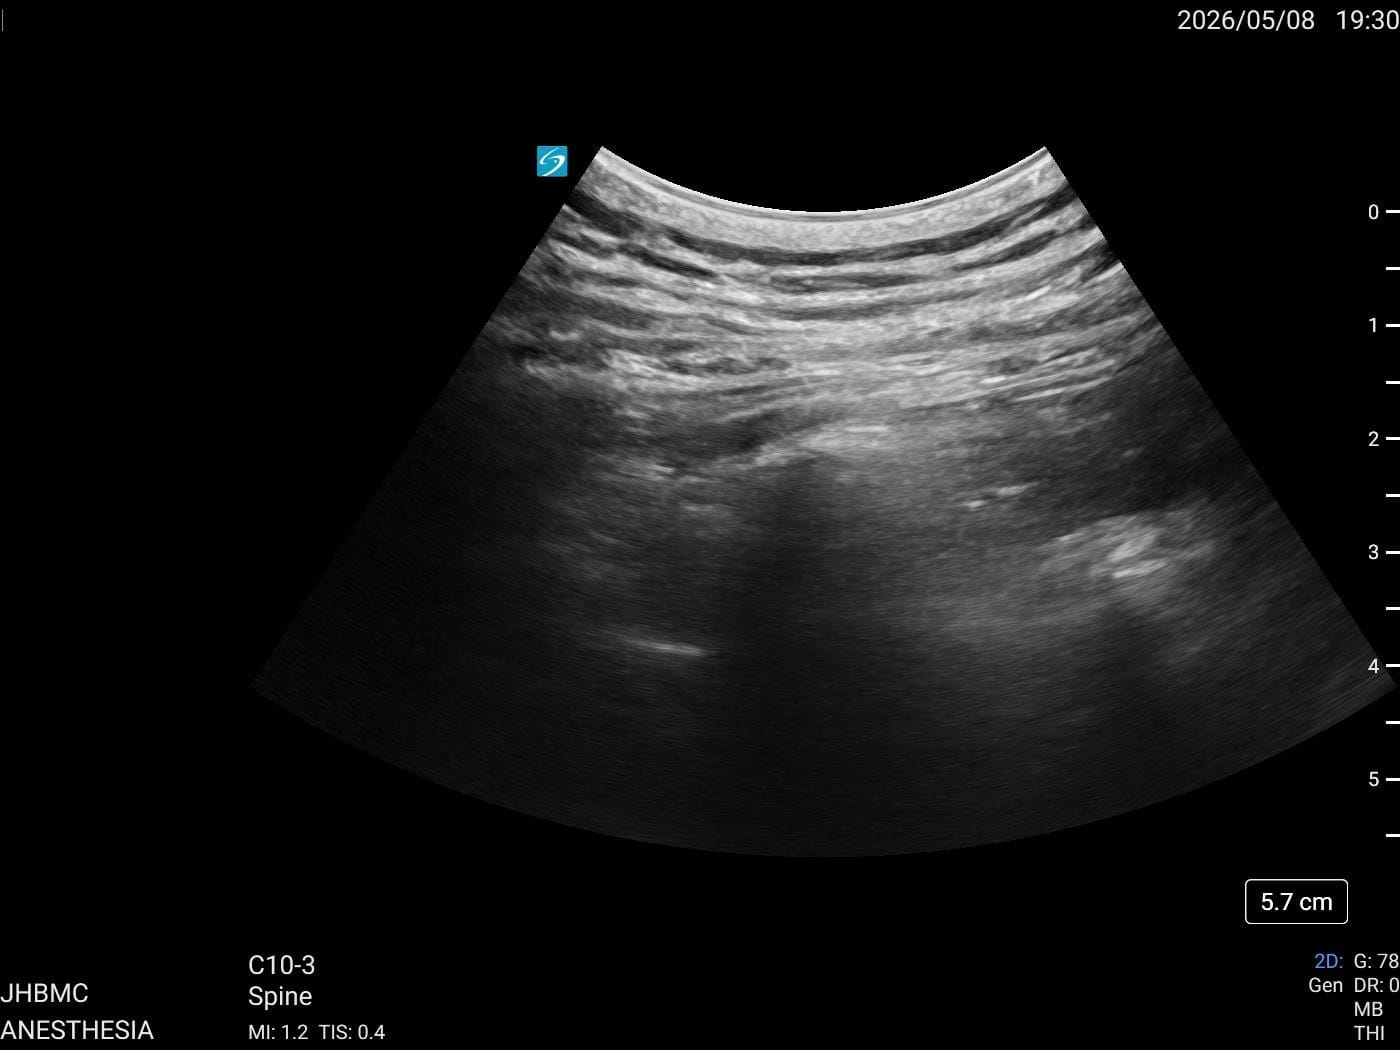
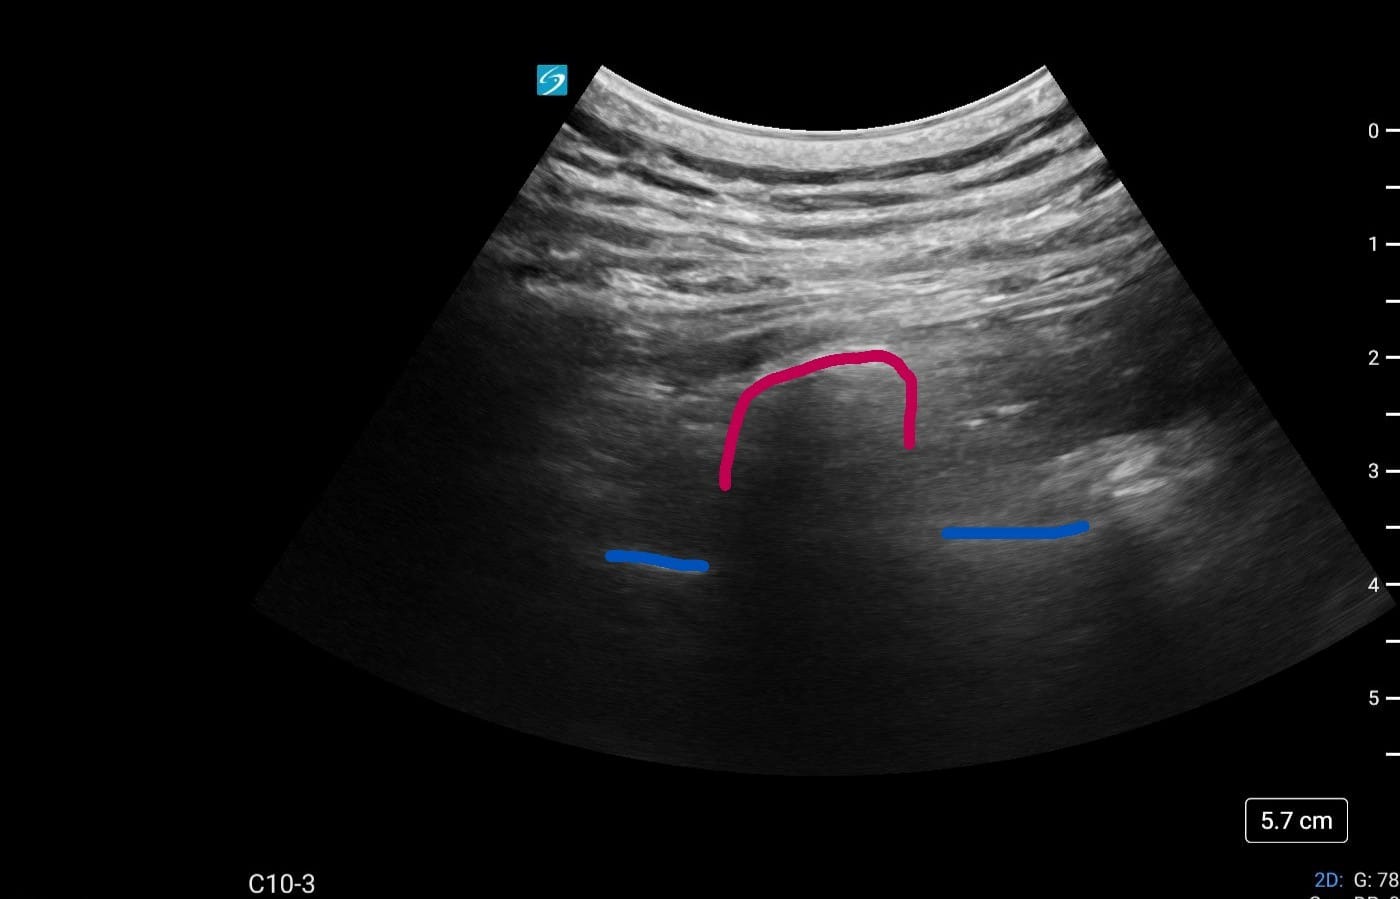
From here, slide more medially to identify the lamina, which will be bright white lines, and the valleys between the lamina will be the inter-laminar window. (Figures 3A–C) This interlaminar window is where the epidural needle will pass to reach the epidural space. Now rotate the ultrasound probe so that the cephalad portion is medial and directed to the contralateral side, while the caudad portion is lateral and directed to the ipsilateral side. (Figure 4A) The caudad portion should be near the mark made earlier based on measurements from the axial and sagittal CT scan analyses. On the ultrasound screen, the goal is to see a bright white line that is the lamina, and the next goal is to bring the epidural needle to the cephalad side of that white line, which is the inferior end of the interlaminar window. (Figures 4B and C)
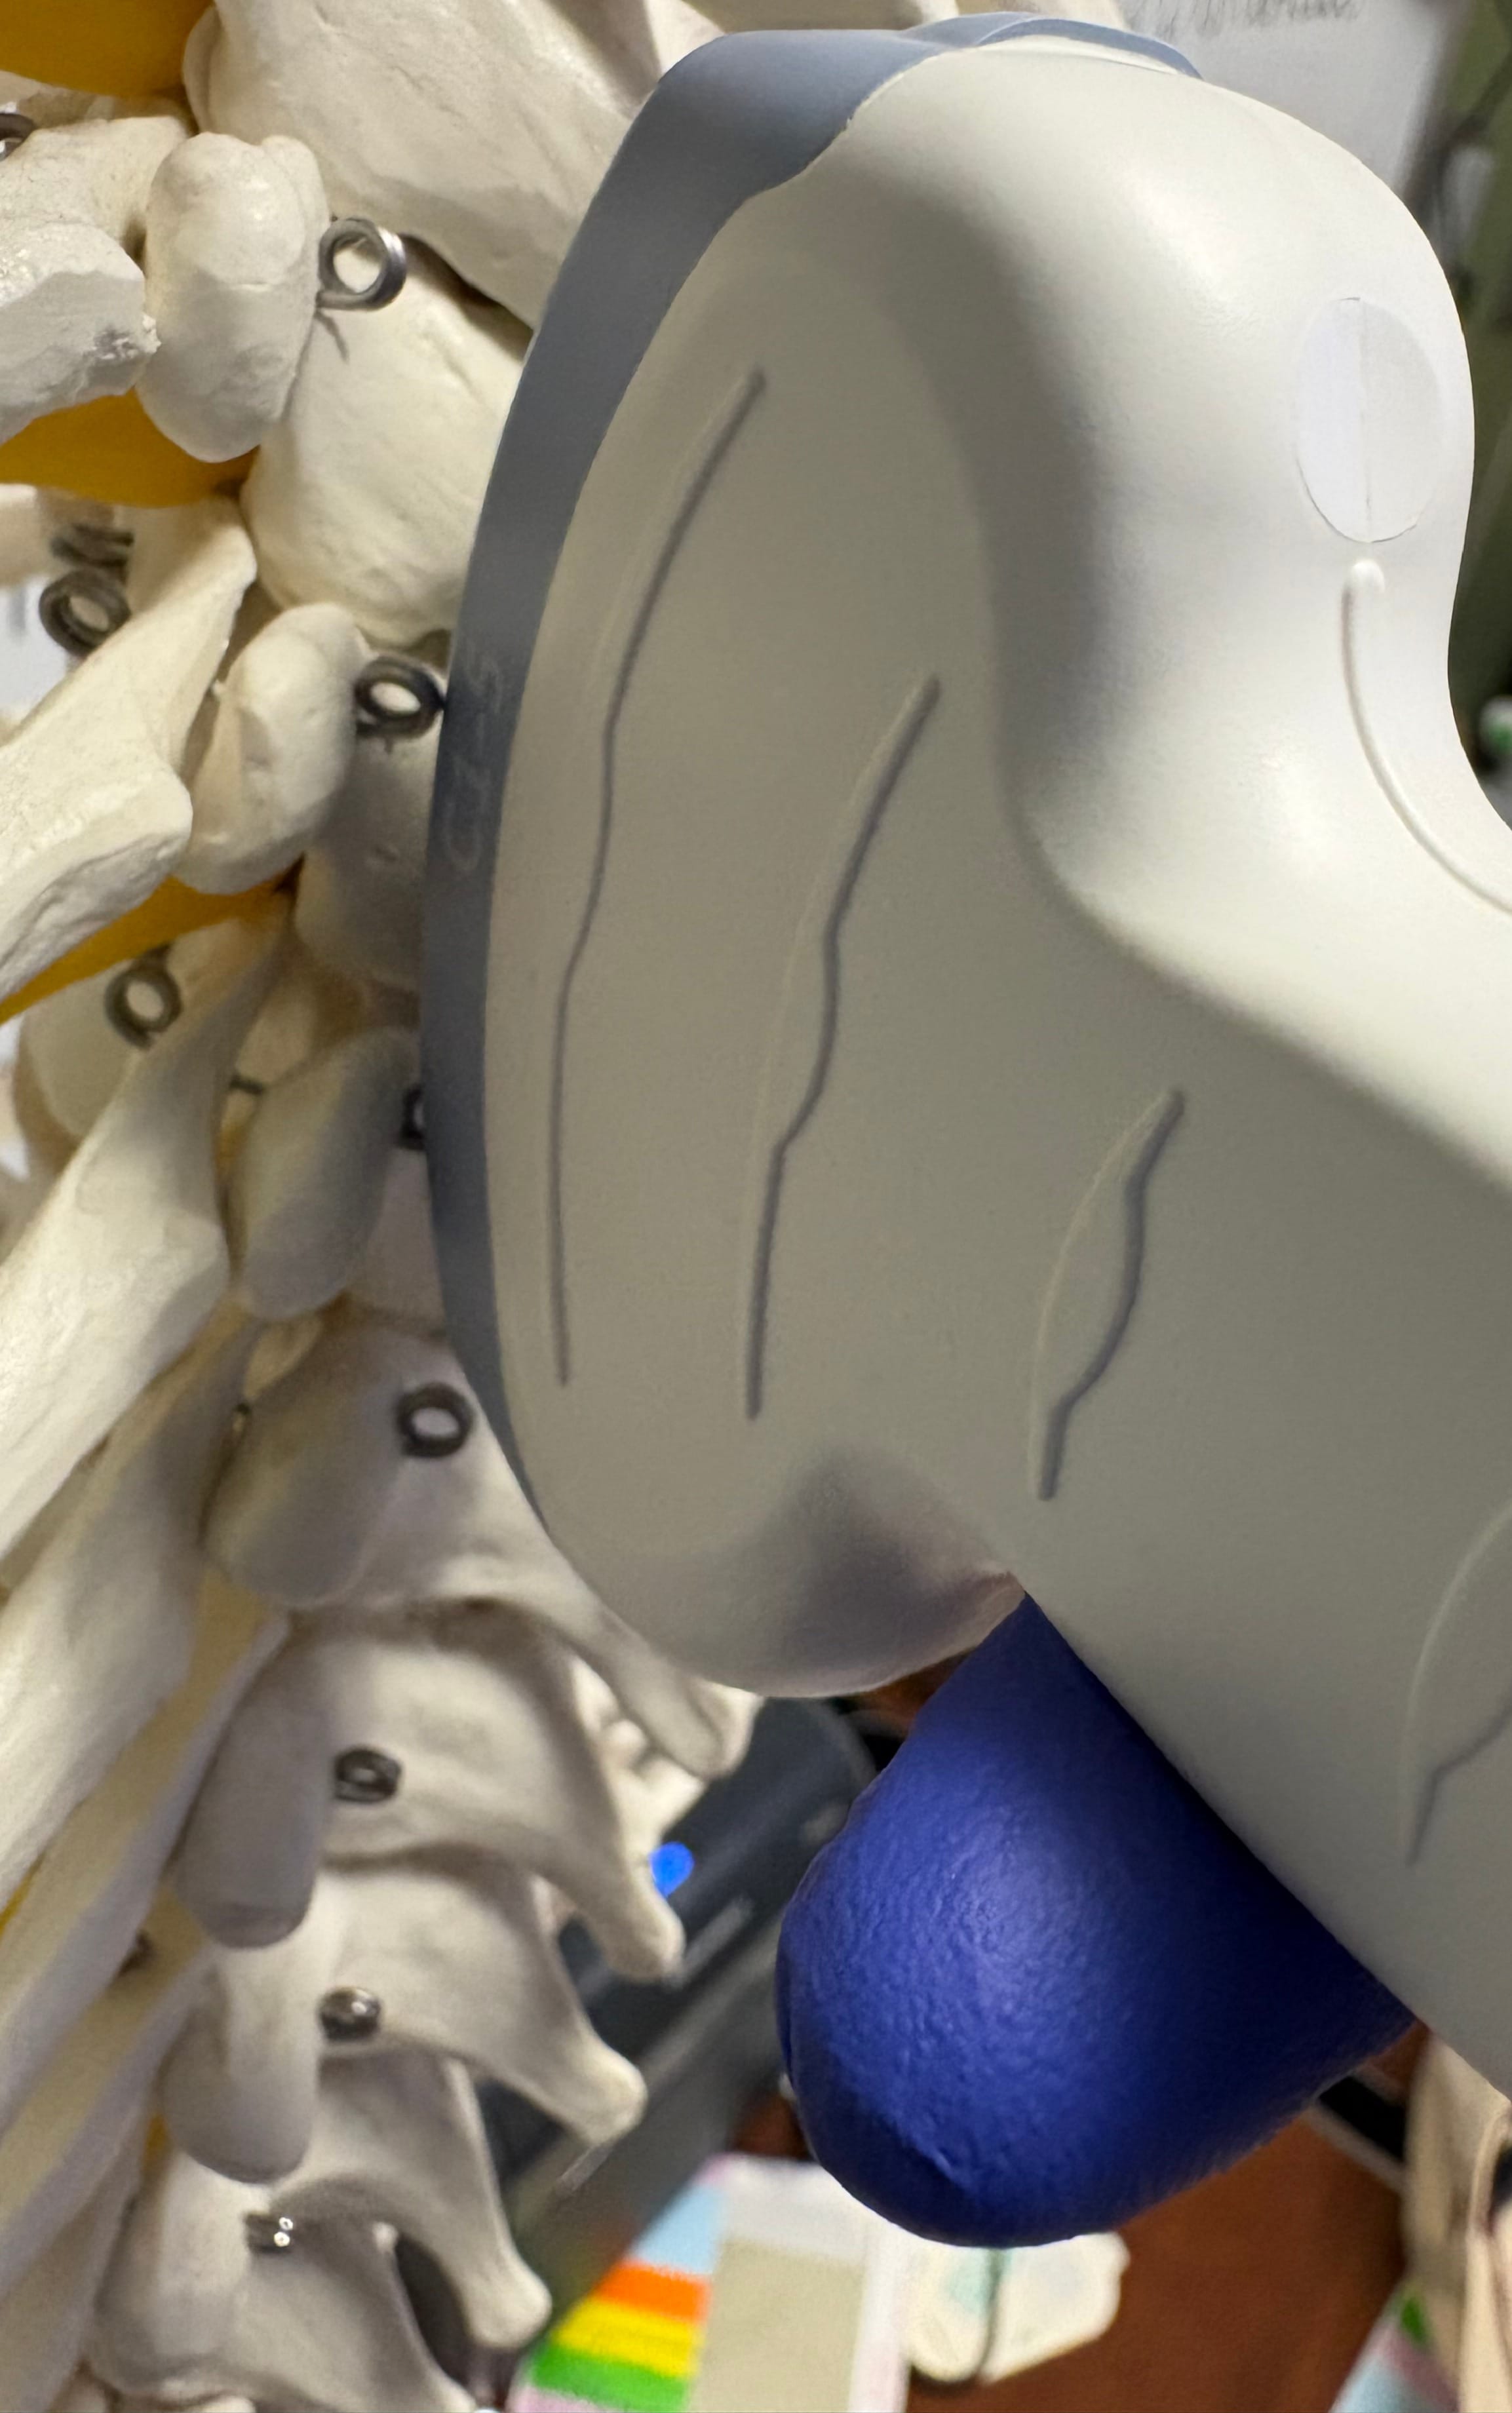
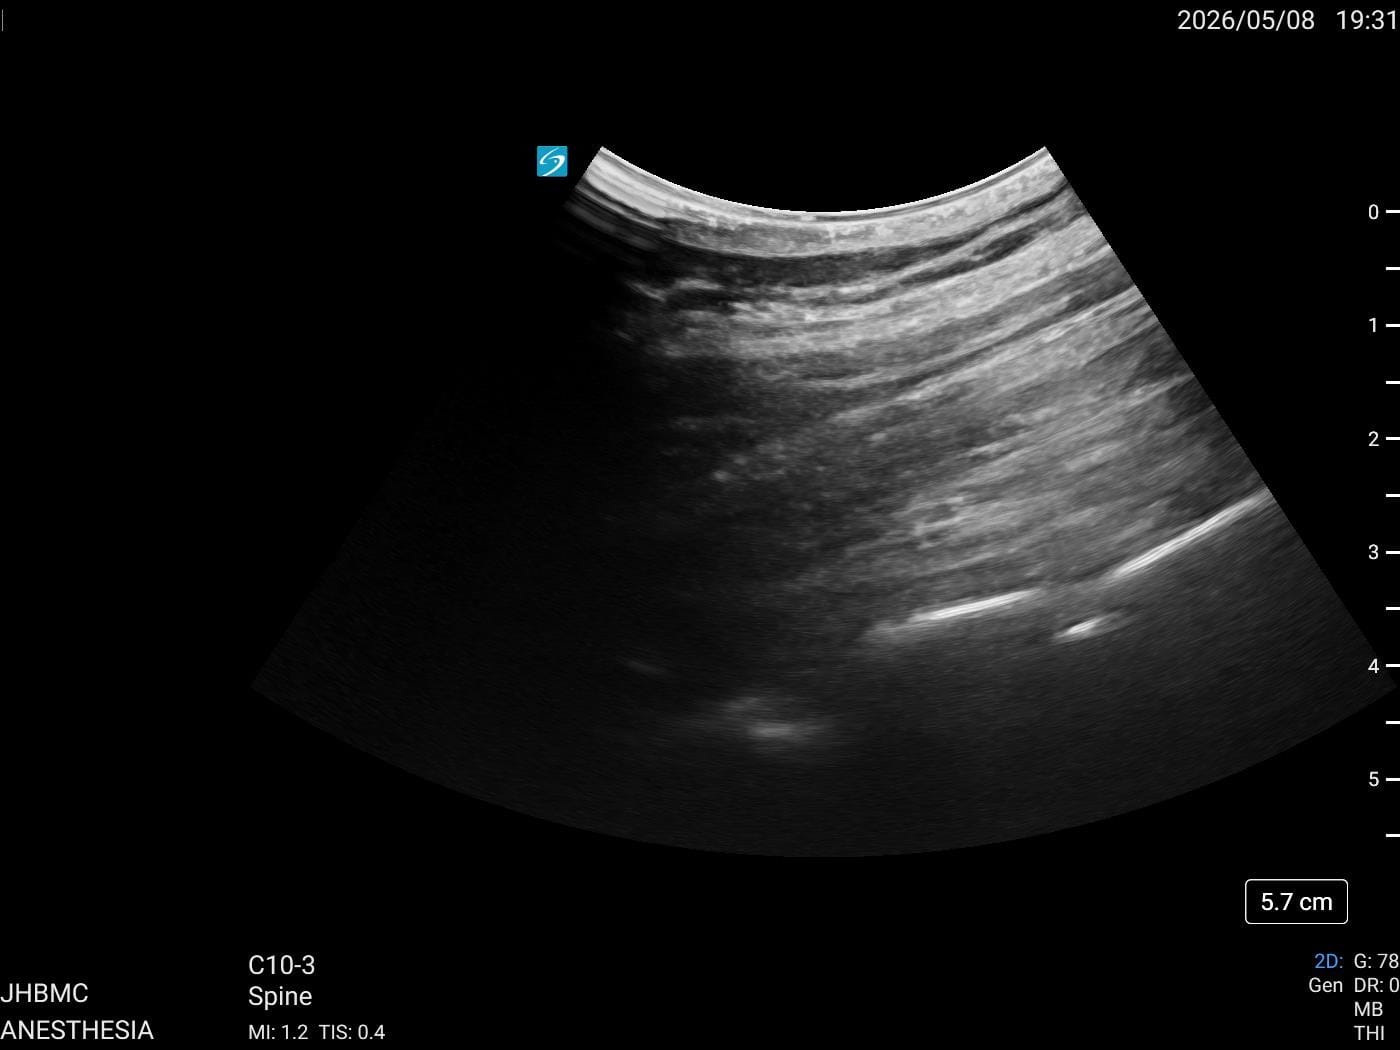
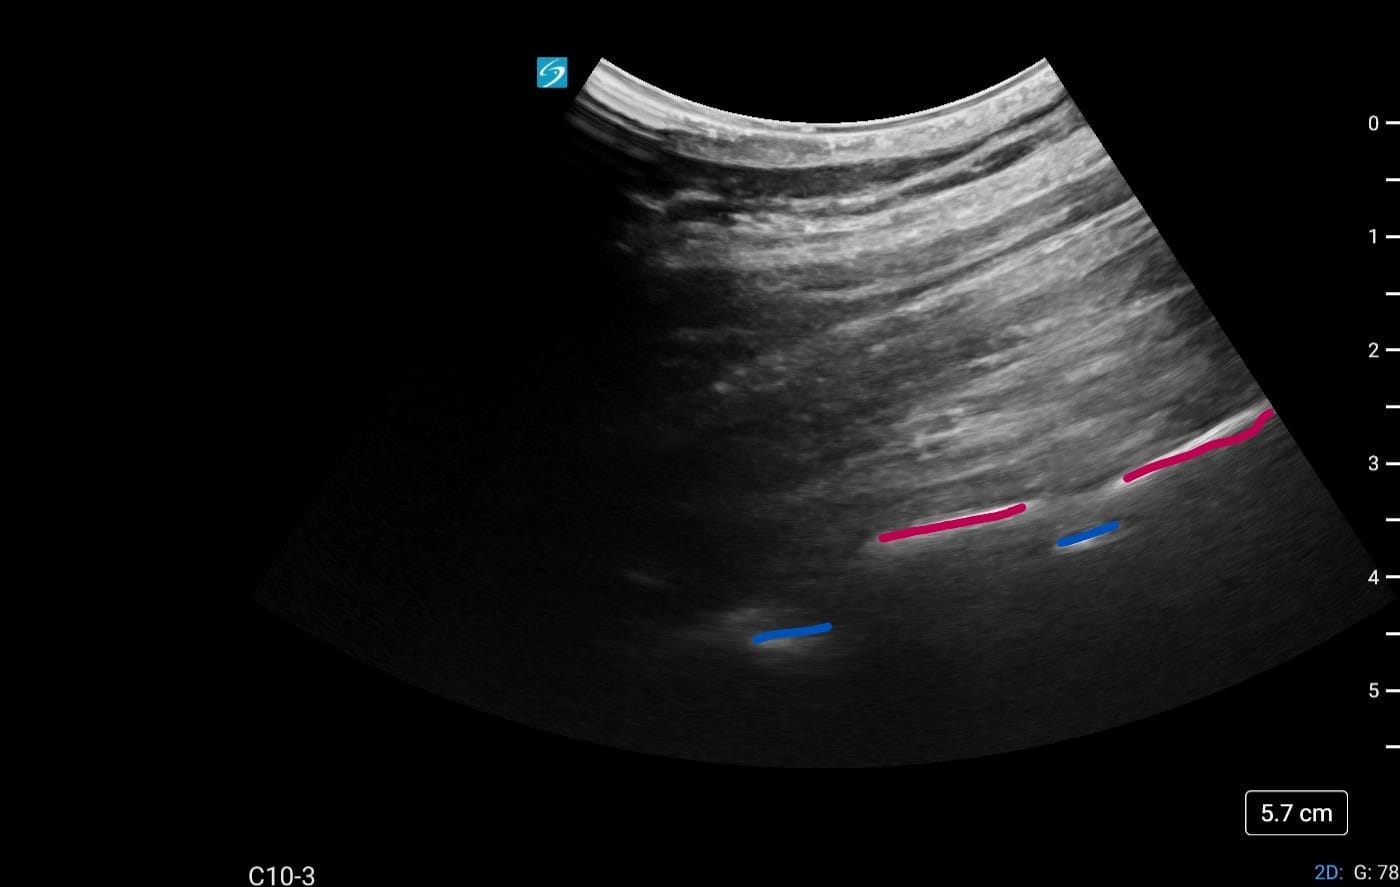
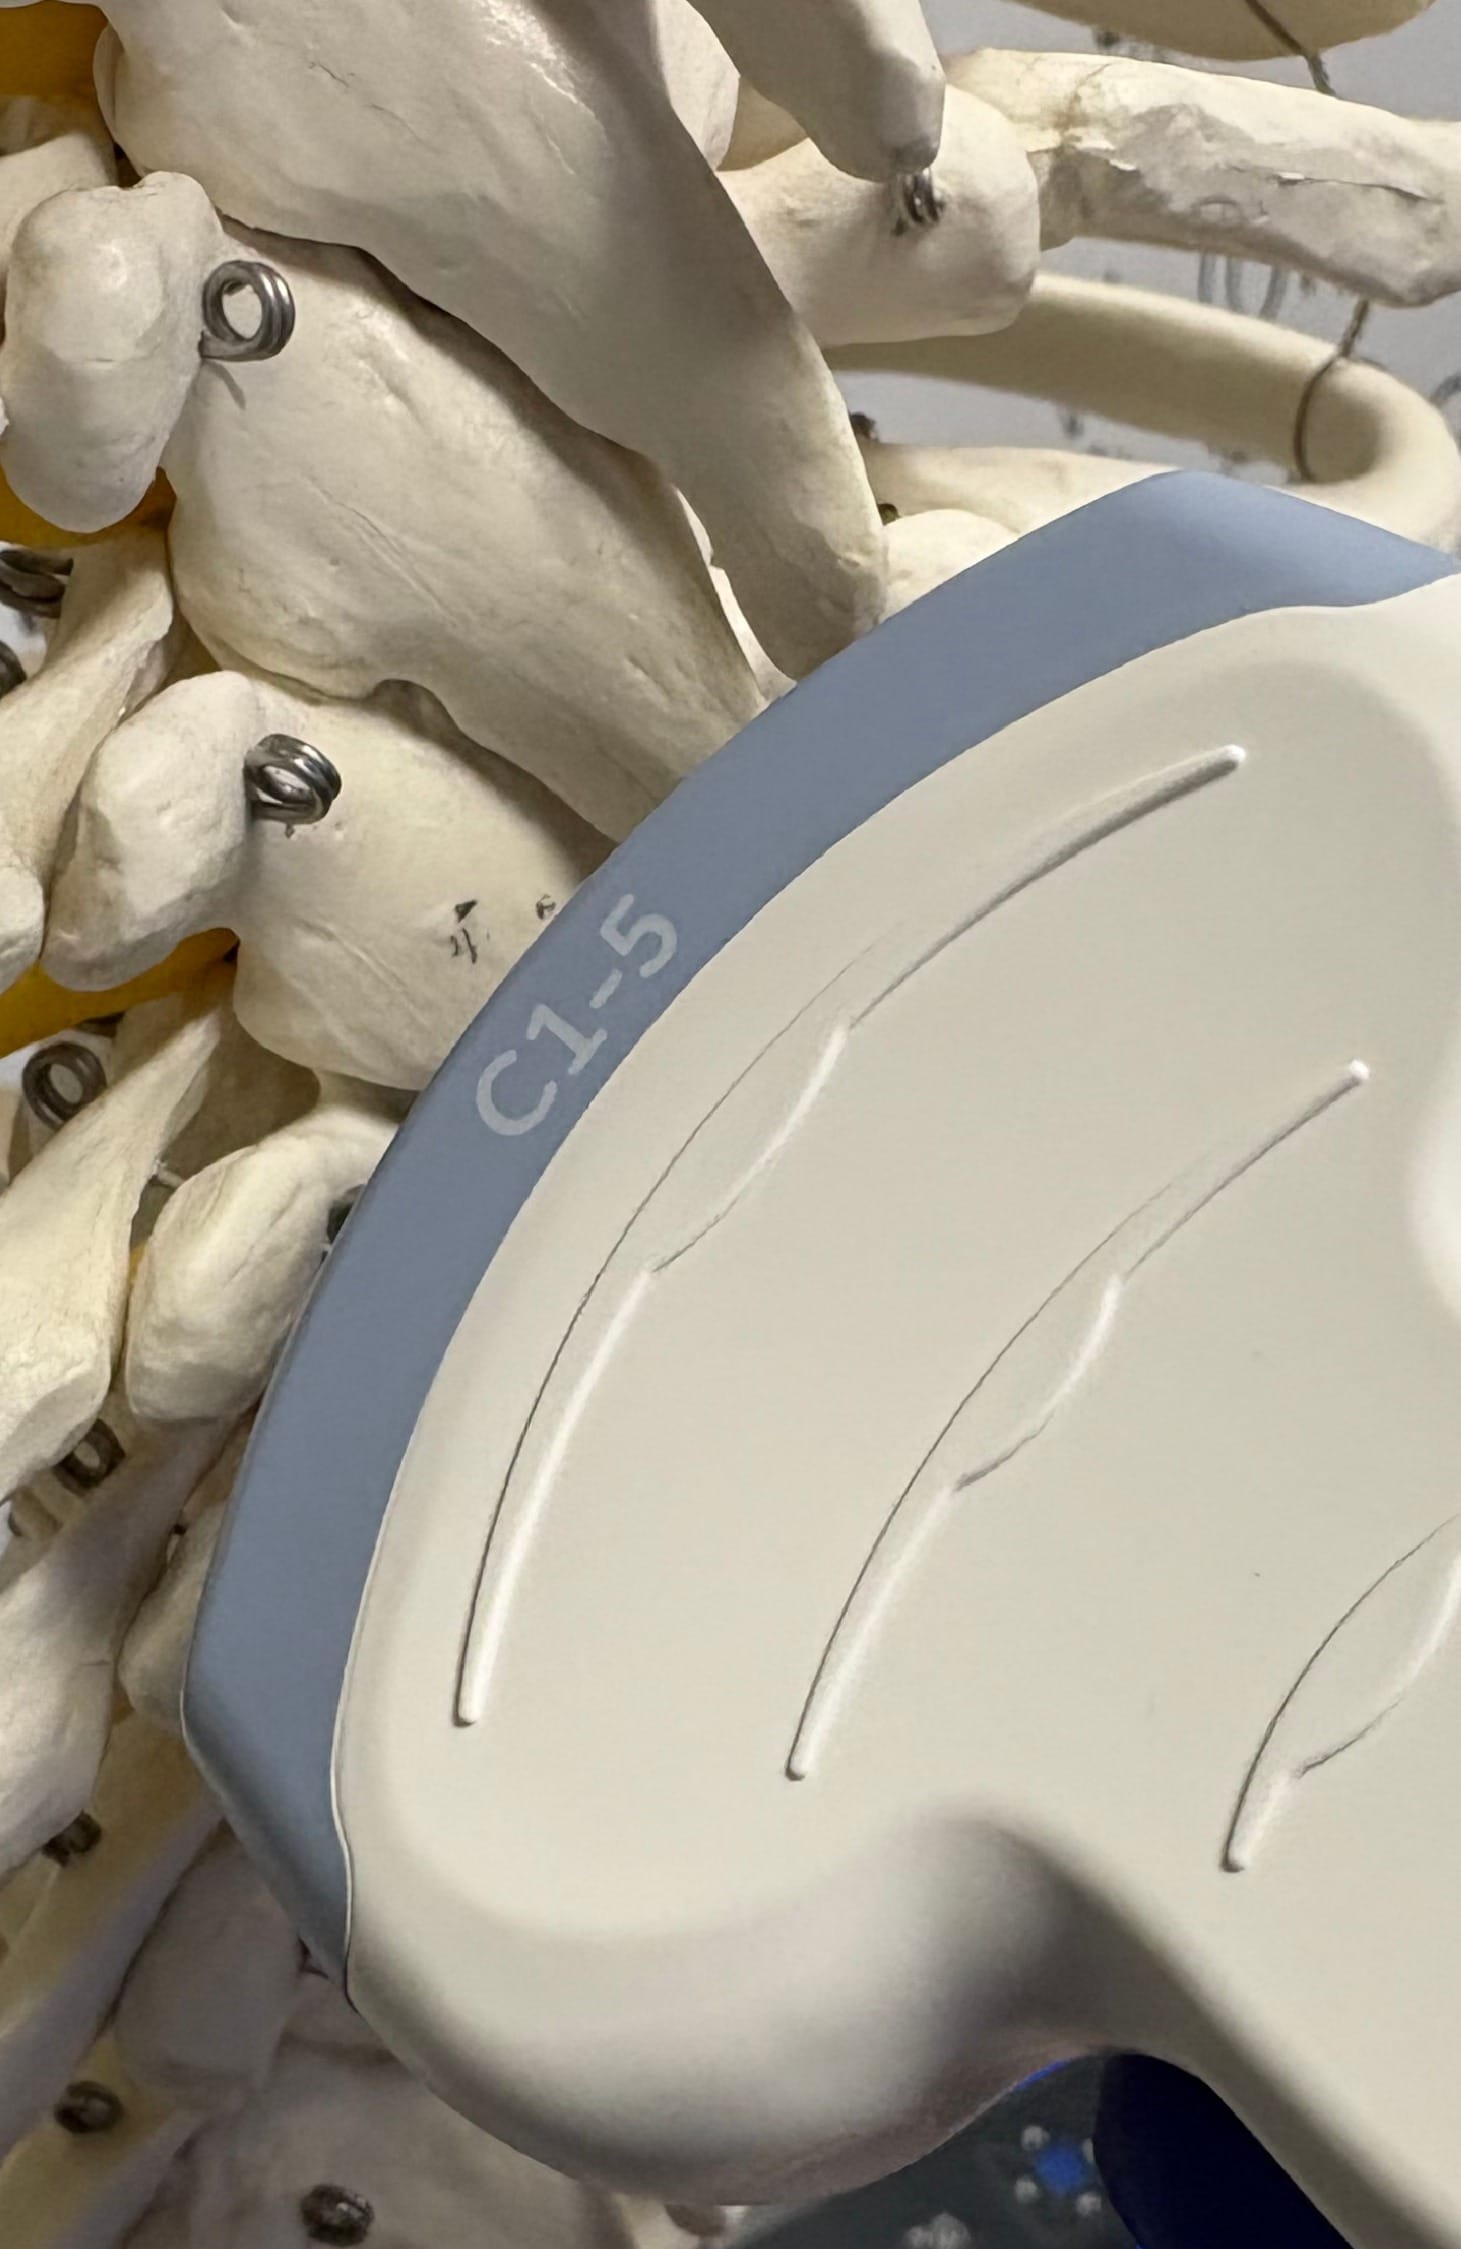
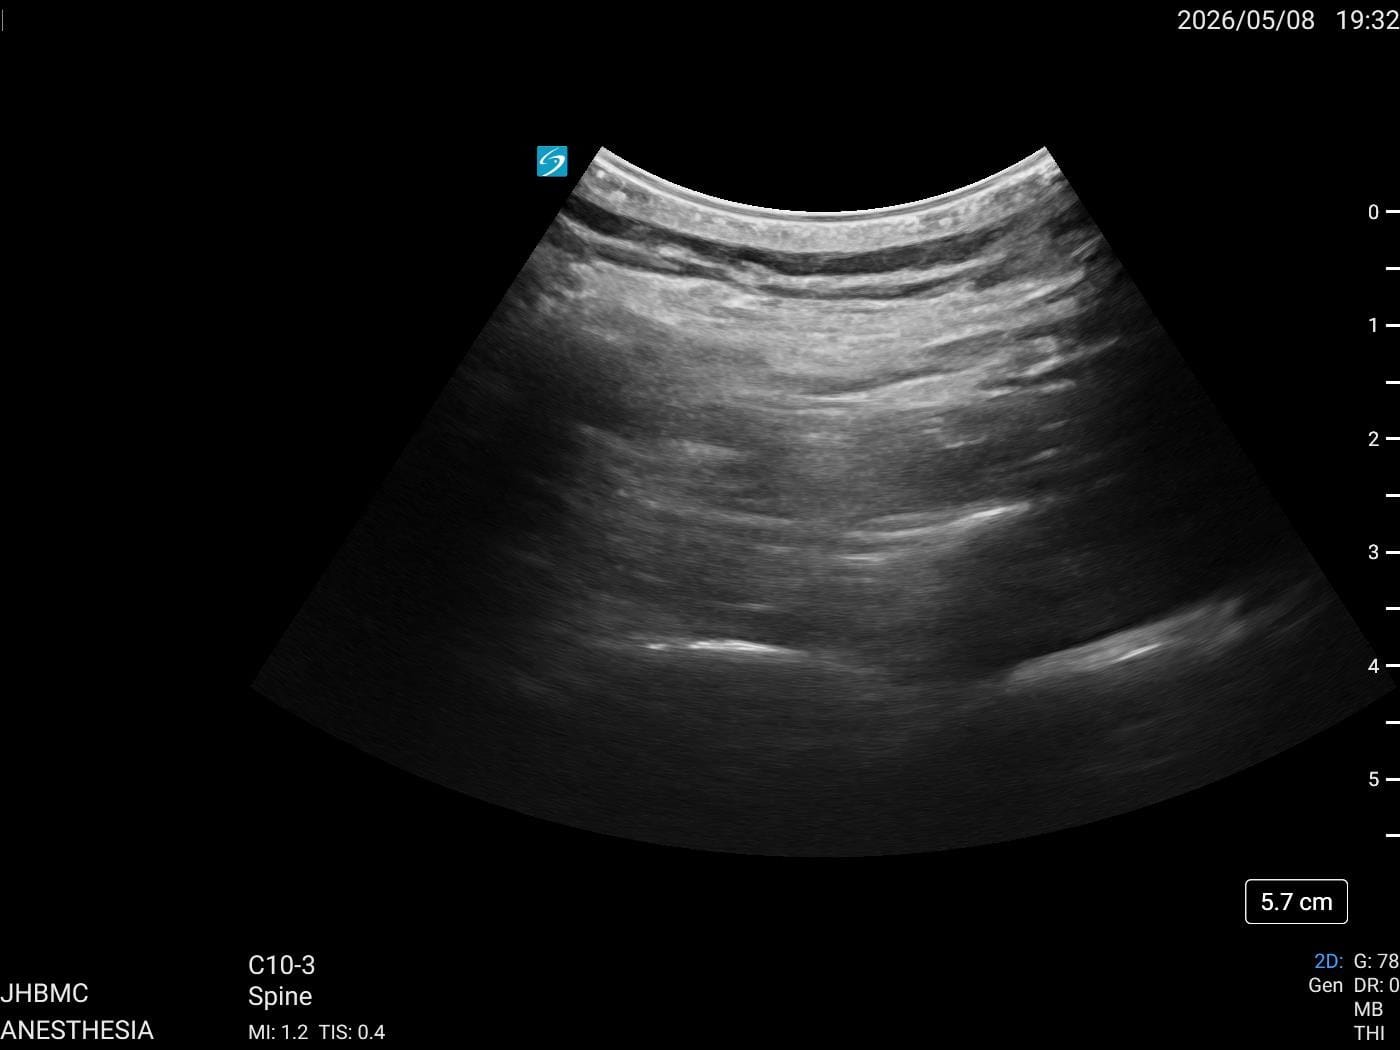
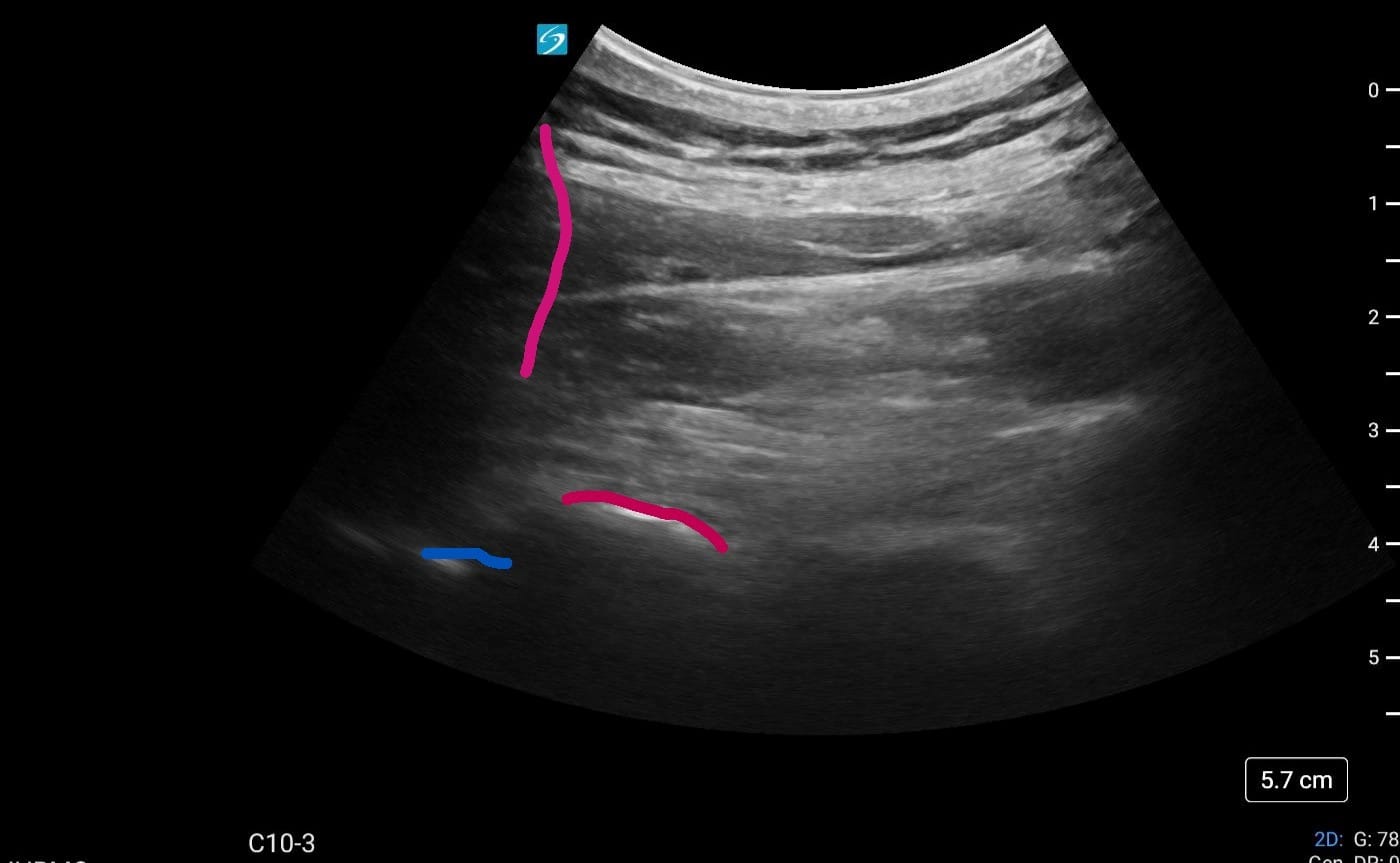
Use a 25-gauge needle to raise a wheal in the skin and administer local anesthetic at the injection site. This needle is in-plane on ultrasound and approximates the epidural trajectory. This is then removed, and more local anesthetic is drawn up, as the proceduralist will now be using this syringe with the epidural needle to numb deeper structures for example, the os of the lamina. Another benefit of this pause is that it gives the field block more time to set up.
Now take the winged epidural needle in the dominant hand and insert it into the anesthetized location with the goal of landing at the inferior edge of the interlaminar window on ultrasound. Once on the bone, the stylet is removed, and further local anesthetic is injected for comfort. The stylet is then replaced. Put the ultrasound down and then begin carefully walking off the lamina into the inner laminar window, now using both hands in the plane of the prior ultrasound beam. Once the proceduralist has walked off of the lamina, the stylet is removed, and loss of resistance is checked. The entire apparatus is then advanced in a controlled, meticulous manner until the epidural space is identified by loss of resistance. The catheter is threaded and left at the appropriate depth. Aspiration and test dosing are then performed.9
Troubleshooting Tips
When using the landmark-based technique, the most common misdirection is overcorrecting toward the contralateral side. However, with the real-time ultrasound-guided technique, the overcorrection is often towards the ipsilateral side. The bevel would then wind up in the paravertebral space. The paravertebral space will also show a loss of resistance, as in the epidural space.10 However, unlike the epidural space, the catheter will be difficult to thread. This is a reason why it is critically important when using this technique not to aggressively push the catheter through resistance. These redirections are best done with the ultrasound in-plane.
For low-BMI patients, it is possible to do this with a linear probe and even to bring the needle into the inter-laminar window. The footprint of the ultrasound probe sometimes becomes an issue in these small-habitus patients. They may make the insertion site too far away from where it needs to be. A standard curvilinear probe can also be used, but it may be necessary to hold the probe in such a way that firmer contact is made on the medial short edge of the probe so that the epidural insertion site could be accommodated underneath the probe on the lateral short edge to align with the insertion site marked based on prior radiological assessment.
Conclusion
The downside to this technique is that the setup will take more time on the front end compared to conventional landmark-based epidural placement. However, especially in the setting of difficult habitus, it is the authors’ experience that the technique will pay dividends in shortening the length of the procedure compared to difficult landmark technique, where one can be blindly fishing in a case with challenging anatomy. The authors hope that this article spurs further investigation into how this technique can be used to help patients in the future as technical expertise in this area continues to evolve.


References
- Ökmen K, Yıldız DK. Landmark-guided versus real-time ultrasound-guided combined spinal-epidural anesthesia techniques: paramedian sagittal oblique and transverse interlaminar approach. J Med Ultrasound 2024;32(1):55-61. https://doi.org/doi:10.4103/jmu.jmu_22_23
- Tran D, Kamani AA, Al-Attas E, et al. Single-operator real-time ultrasound-guidance to aim and insert a lumbar epidural needle. Can J Anaesth 2010;57(4):313-21. https://doi.org/10.1007/s12630-009-9252-1
- Pakpirom J, Thatsanapornsathit K, Kovitwanawong N, et al. Real-time ultrasound-guided versus anatomic landmark-based thoracic epidural placement: a prospective, randomized, superiority trial. BMC Anesthesiol 2022;22(1):198. https://doi.org/10.1186/s12871-022-01730-5
- Kwon HJ, Lee JB, Lee K, et al. Real-time ultrasound guidance versus fluoroscopic guidance in thoracic epidural catheter placement: a single-center, non-inferiority, randomized, active-controlled trial. Reg Anesth Pain Med 2024;49(3):168-73. https://doi.org/10.1136/rapm-2023-104406
- Vogel H, Schaaf W, Jacob M. Videoassistierte anästhesiologische Patientenaufklärung: Wie bewerten ärztliche Anwender das Verfahren? Anaesthesist 2018;67(11):829-36. https://doi.org/10.1007/s00101-018-0496-4
- Holm JH, Bak M, Brøchner AC. Epidural analgesia versus systemic opioids for postoperative pain management after VATS: A systematic review and meta-analysis. Acta Anaesthesiol Scand 2025;69(9):e70122. https://doi.org/10.1111/aas.70122
- Gropper MA, Miller RD, Cohen N,et al. Anesthesia for thoracic surgery. In: Slinger P, Campos JH, eds. Miller’s Anesthesia. 9th ed. Philadelphia, PA: Elsevier Health Sciences; 2019.
- Sutthibenjakul K, Pakpirom J, Siripruekpong S, et al. Real-time ultrasound-guided thoracic epidural placement: illustrating the techniques and reporting on prospective observational study. J Perioper Pract 2025;35(11):560-7. https://doi.org/10.1177/17504589241302221
- Lee JH, Kim DH, Koh WU. Real-time ultrasound guided thoracic epidural catheterization: a technical review. Anesth Pain Med 2021;16(4):322-8. https://doi.org/10.17085/apm.21060
- Batra RK, Krishnan K, Agarwal A. Paravertebral block. J Anaesthesiol Clin Pharmacol 2011;27(1):5-11. https://doi.org/10.4103/0970-9185.76608